From the Workbench
Ken Wheeler (club president)
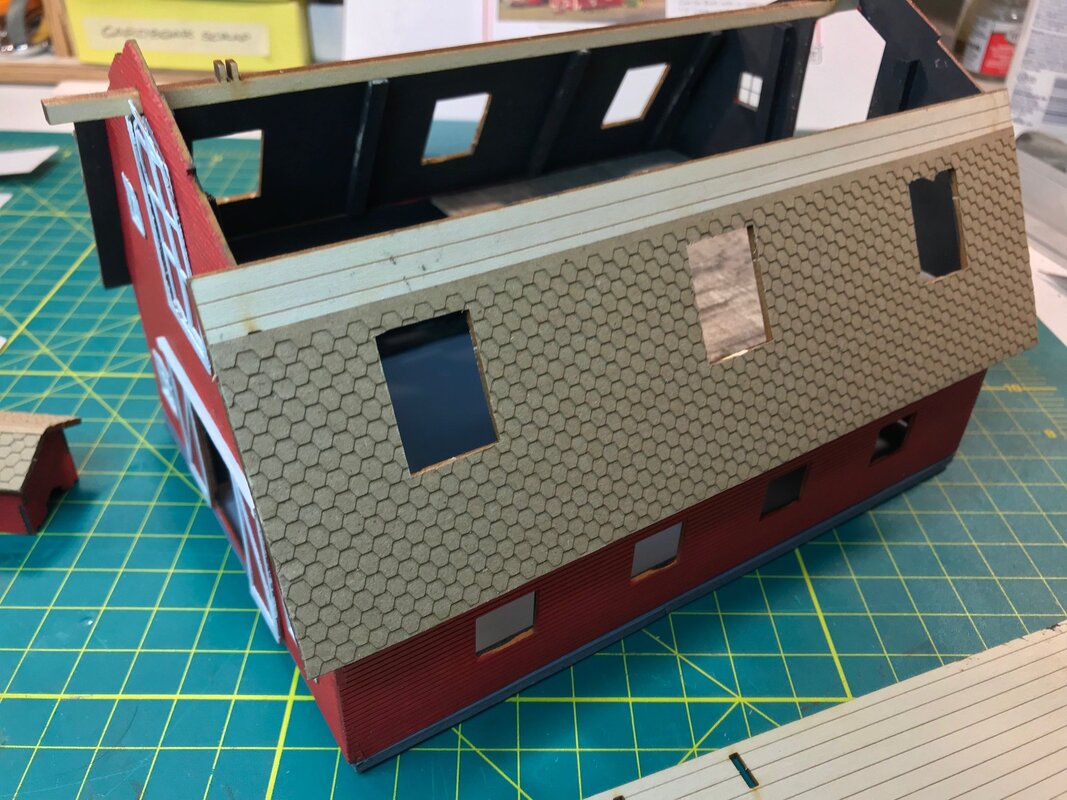
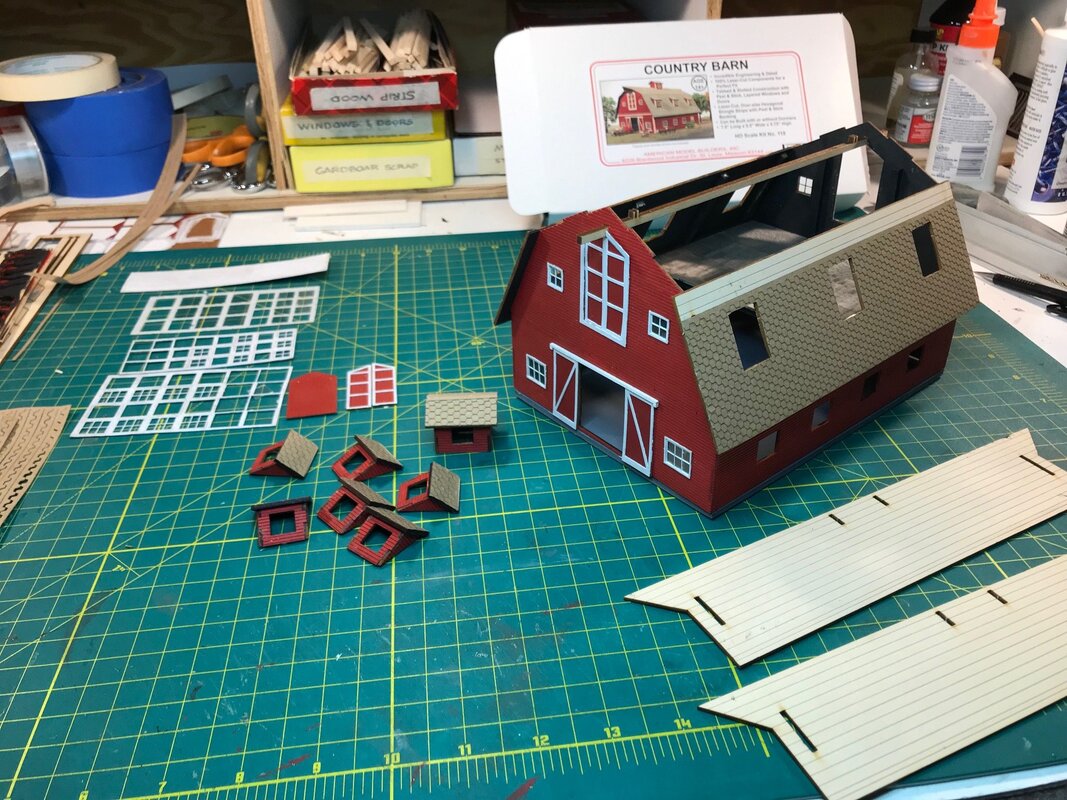
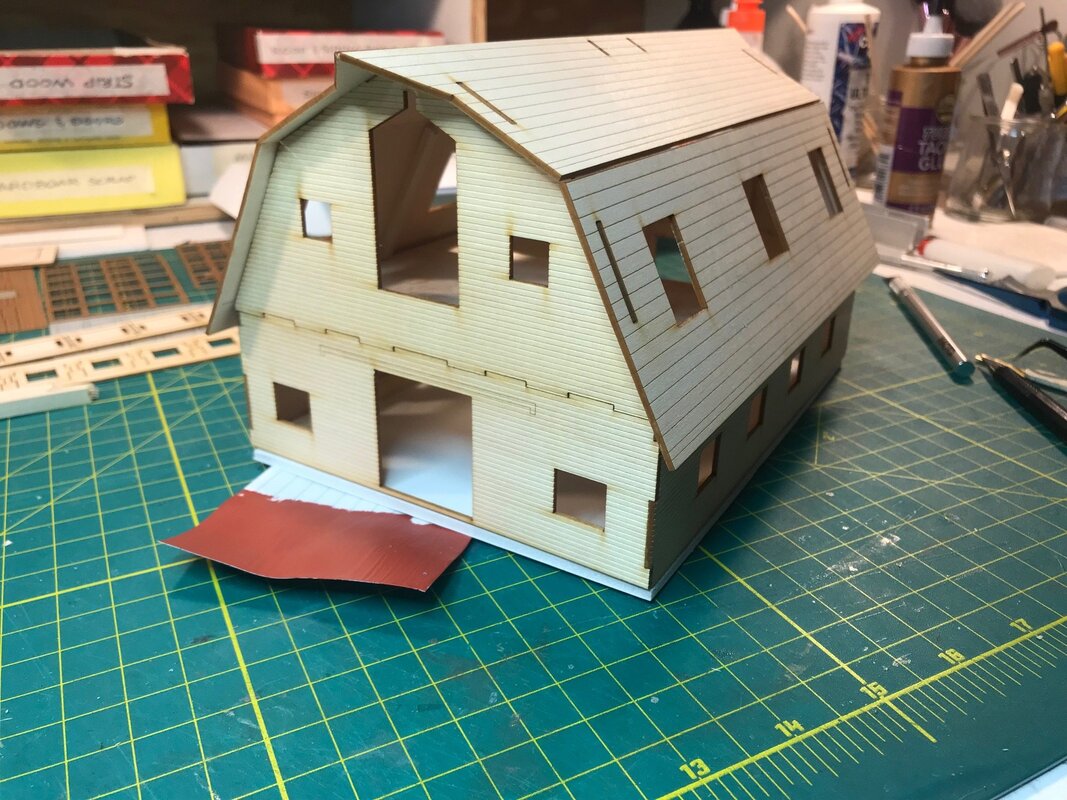
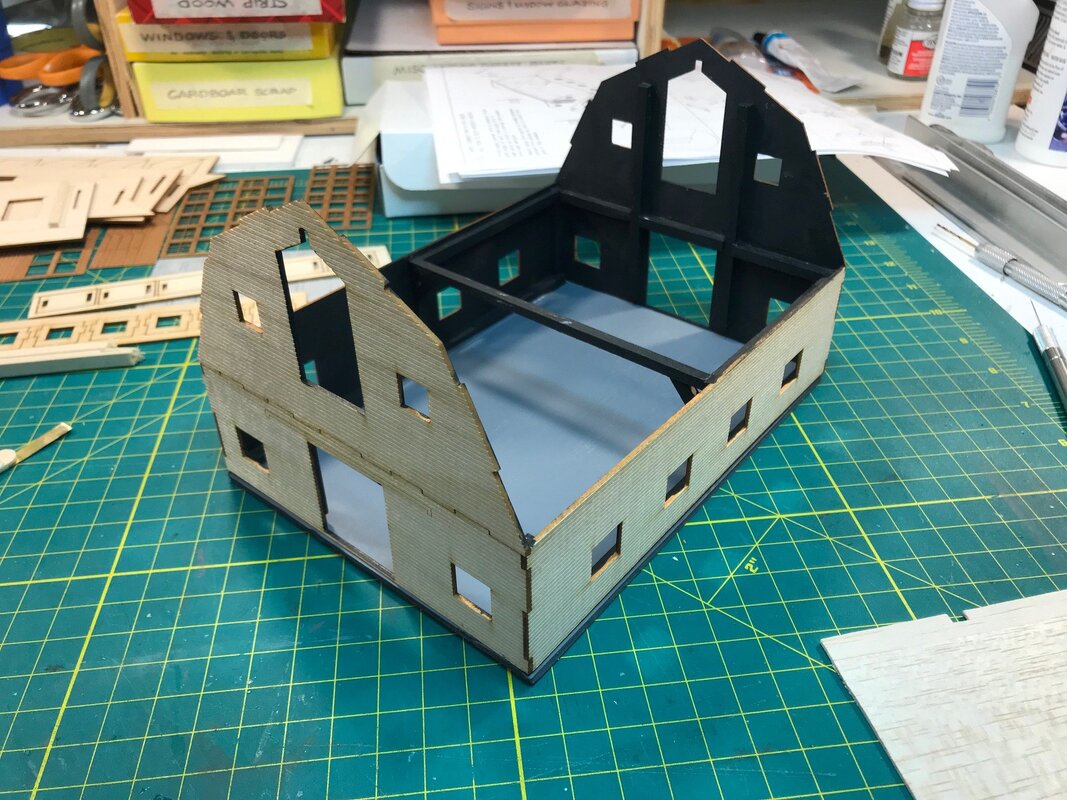
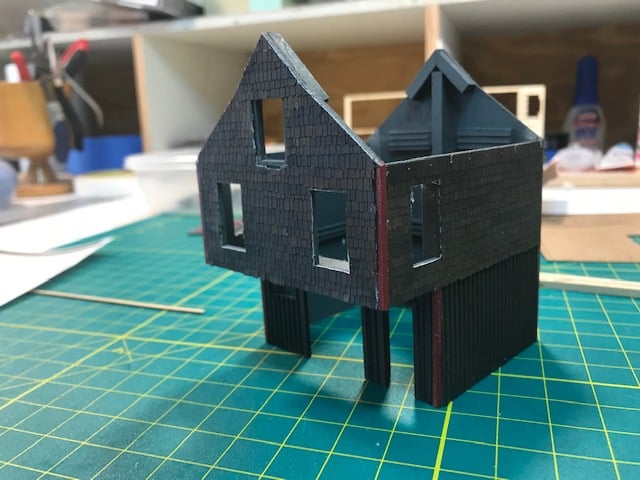
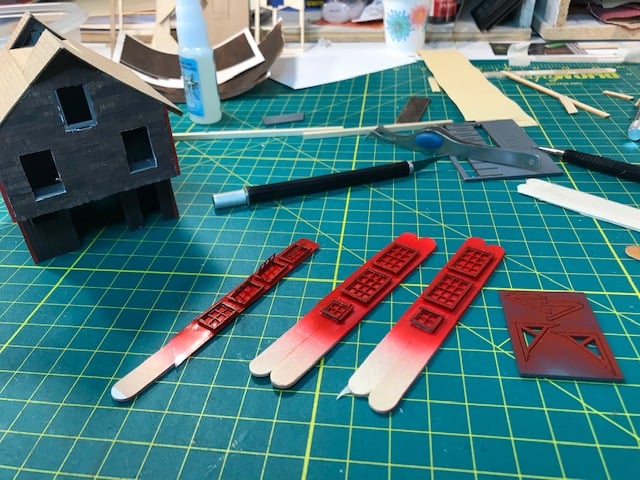
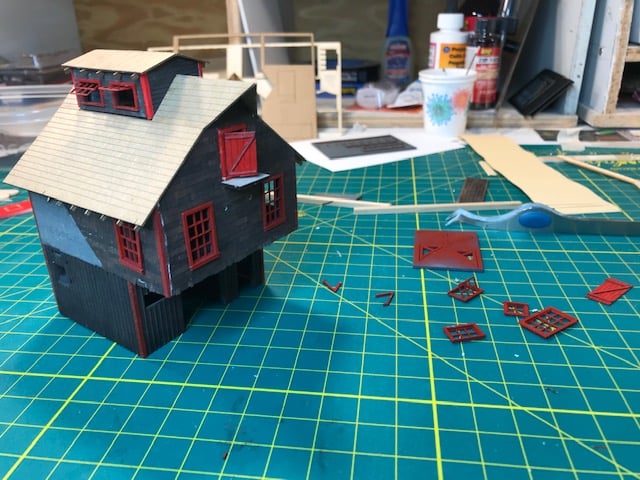
Making progress on "Glen's Barn" Bracing and foundation have been added as well as a hay mow (loft). Inside is painted. Next will be the siding color. Have chosen a muted red with white trim for a very classic, rural American barn. I made the foamcore base(foundation), so that the structure can be lifted off, in case Glen wants to add interior details later.
Making progress on "Glen's Barn" Bracing and foundation have been added as well as a hay mow (loft). Inside is painted. Next will be the siding color. Have chosen a muted red with white trim for a very classic, rural American barn. I made the foamcore base(foundation), so that the structure can be lifted off, in case Glen wants to add interior details later.

Ken Wheeler (club president)
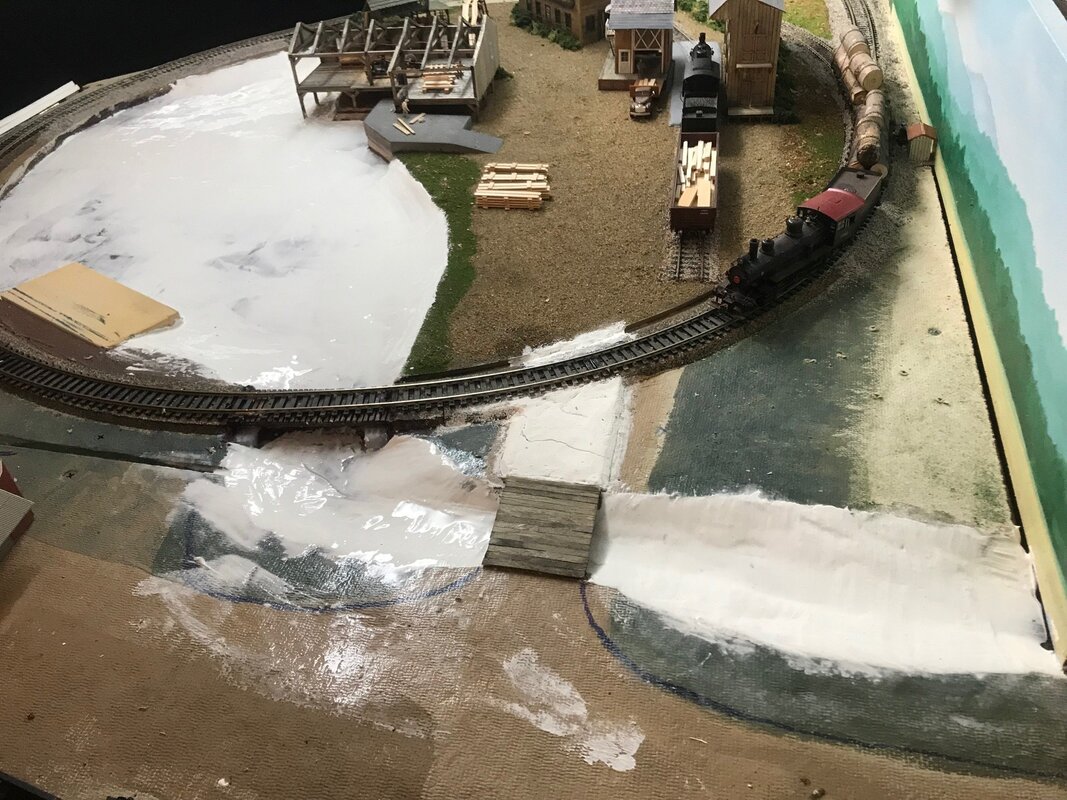
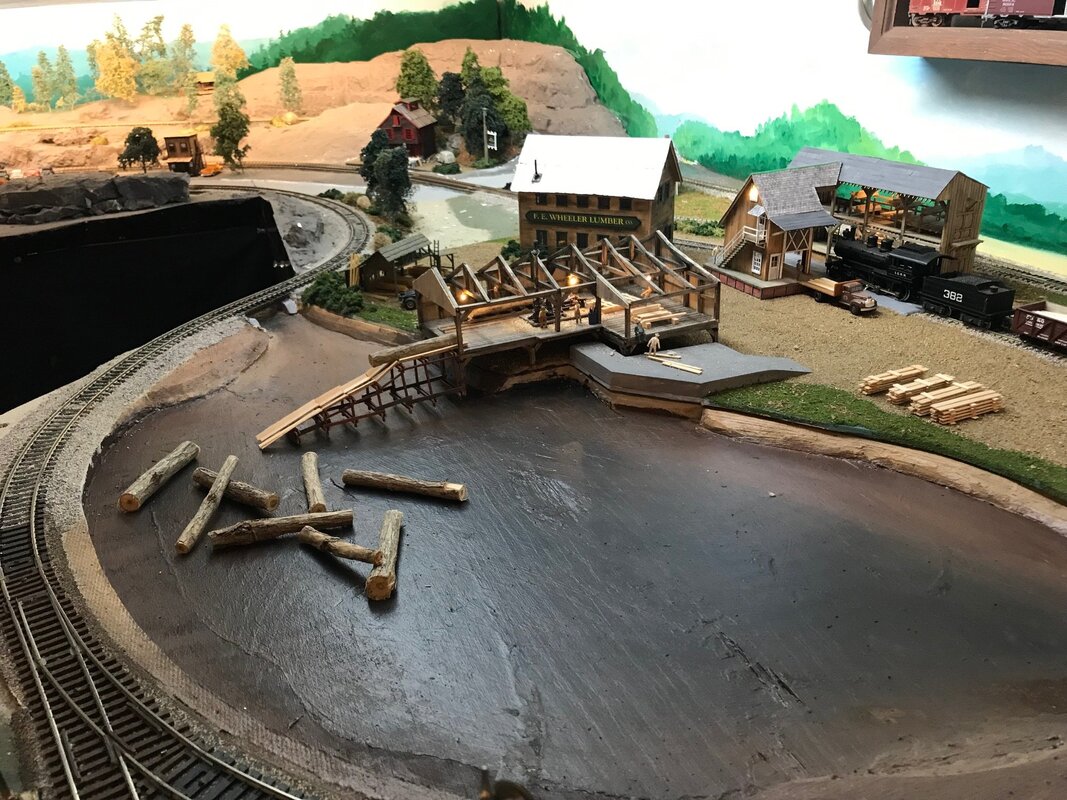
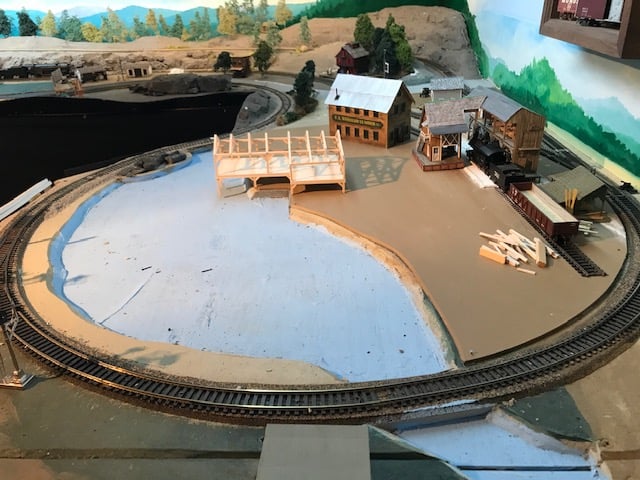
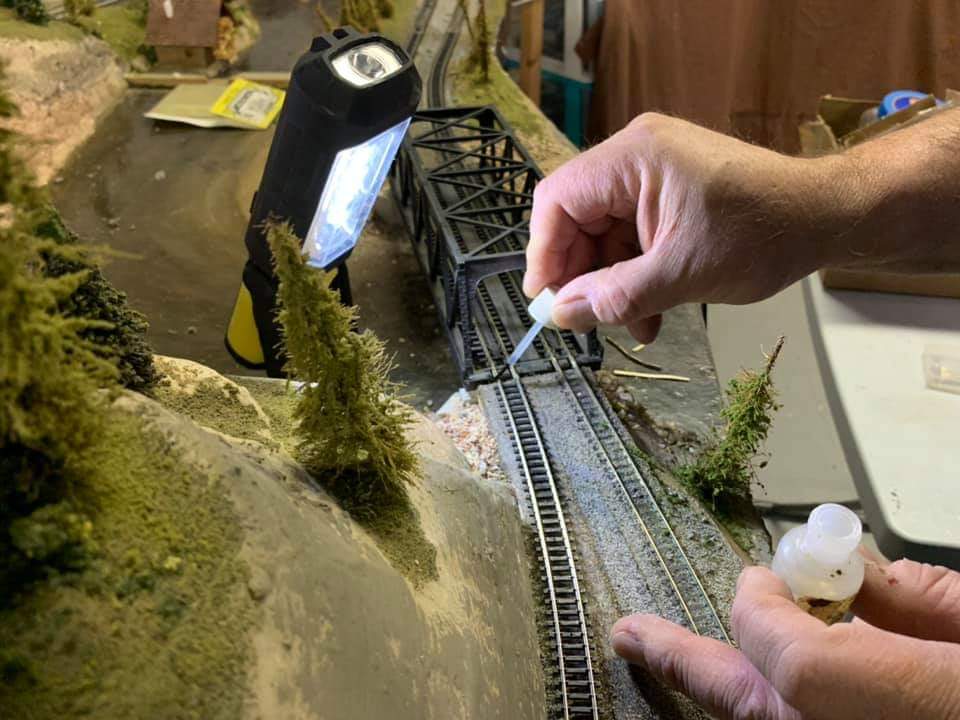
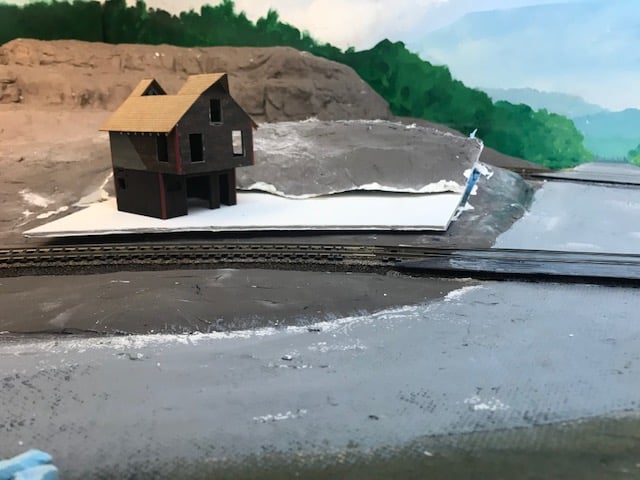
I've been researching how to add water to my log pond. Initially, to define the space I painted it blue, but knew that I wanted it to have a realistic color. Then I worked out and applied a color scheme that I thought would work. My benchwork is .5" plywood and .5" homosote, so where I had removed the homosote, there was unsightly texture from the plywood and the glue, which showed up more when painted and would have been obvious through the water pour. I didn't like that. After conferring with a couple of fellow club members, who have both done water features, I was advised to lay down a layer of plaster (drywall compound). This would allow me to smooth out those unsightly areas as well as taper my slopes and vary the pond bottom to look even more realistic. I like how it is looking. The plaster was easy to sculpt with a paint brush loaded with water. When it dries, I can lightly sand any imperfections and reapply my colors. I think this pond will look like I want it to. Being a member of a model railroad club has huge benefits. My layout will be better for having the influence and guidance form other seasoned modelers. Thanks guys!
I've been researching how to add water to my log pond. Initially, to define the space I painted it blue, but knew that I wanted it to have a realistic color. Then I worked out and applied a color scheme that I thought would work. My benchwork is .5" plywood and .5" homosote, so where I had removed the homosote, there was unsightly texture from the plywood and the glue, which showed up more when painted and would have been obvious through the water pour. I didn't like that. After conferring with a couple of fellow club members, who have both done water features, I was advised to lay down a layer of plaster (drywall compound). This would allow me to smooth out those unsightly areas as well as taper my slopes and vary the pond bottom to look even more realistic. I like how it is looking. The plaster was easy to sculpt with a paint brush loaded with water. When it dries, I can lightly sand any imperfections and reapply my colors. I think this pond will look like I want it to. Being a member of a model railroad club has huge benefits. My layout will be better for having the influence and guidance form other seasoned modelers. Thanks guys!


Ken Wheeler (club president)
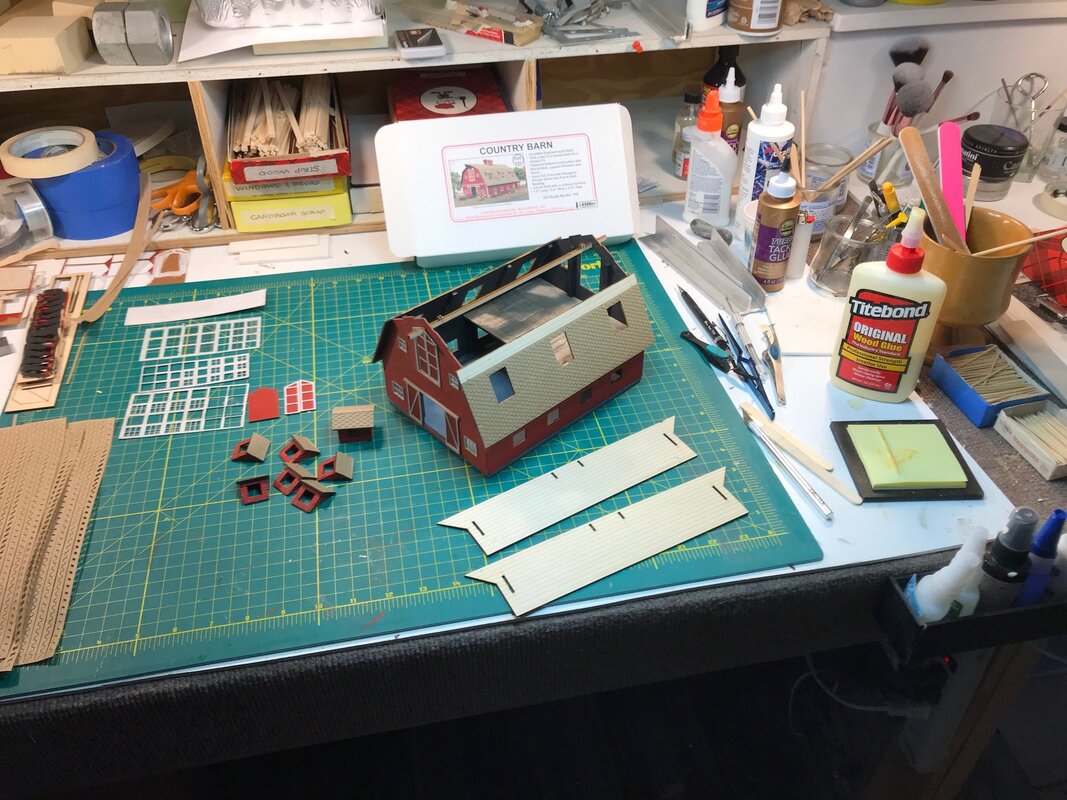
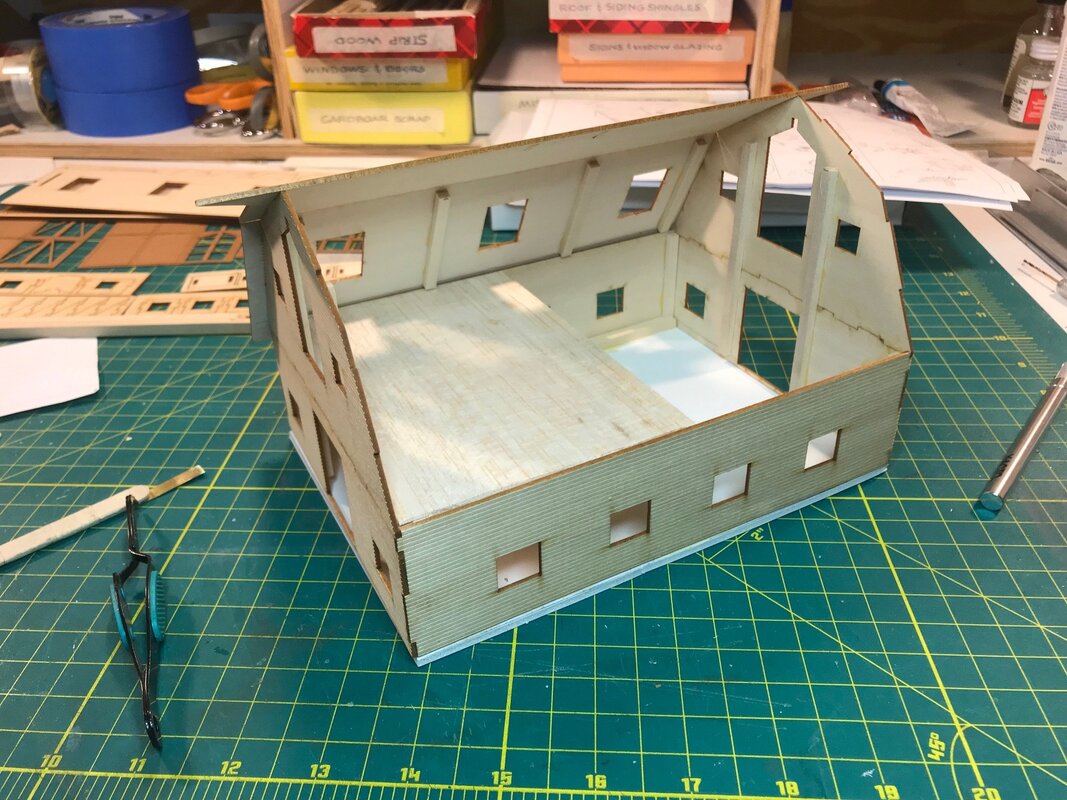
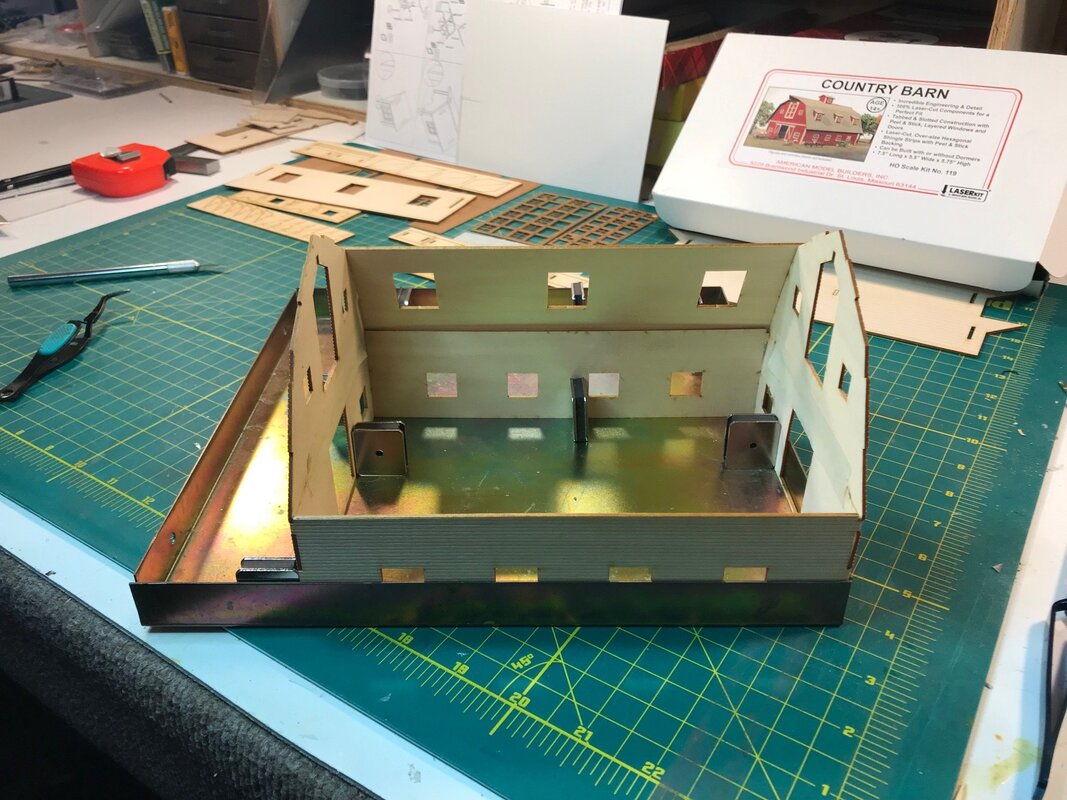
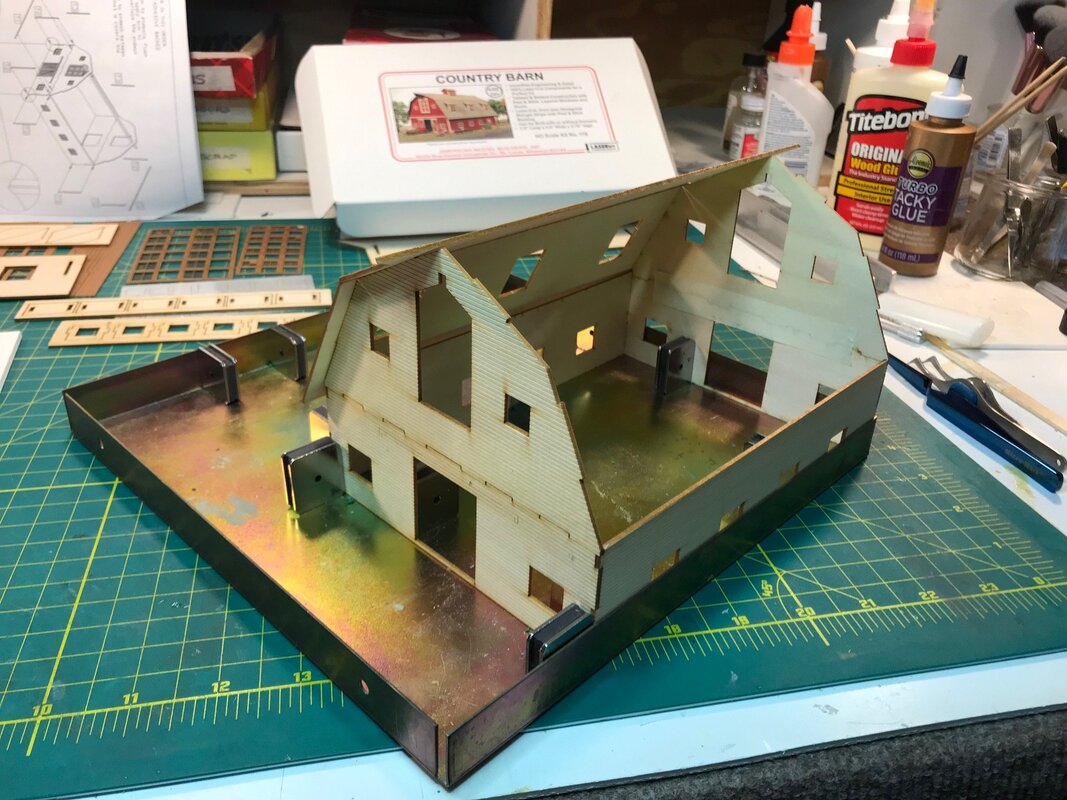
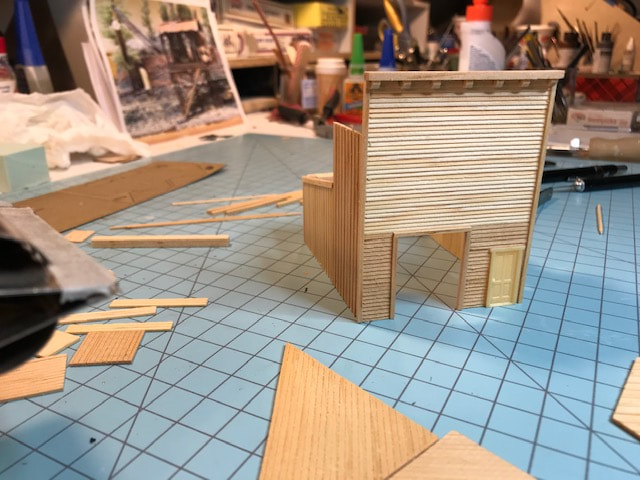
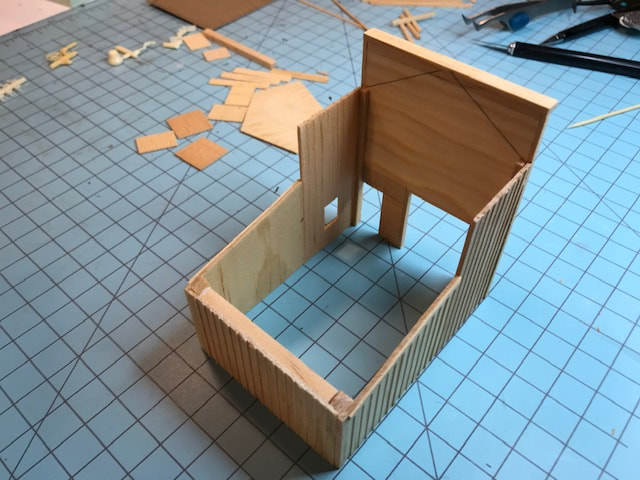
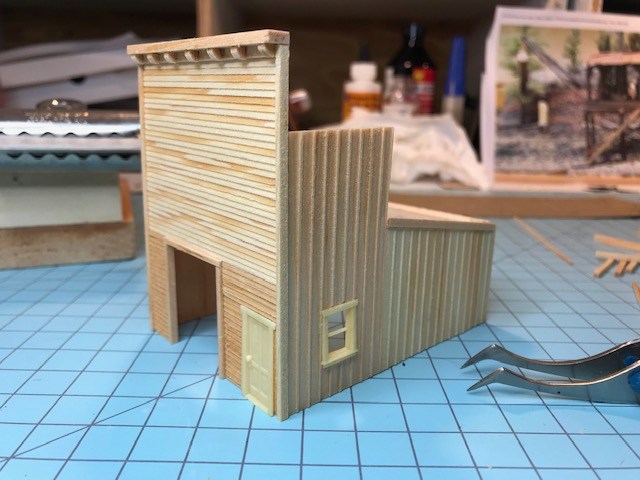
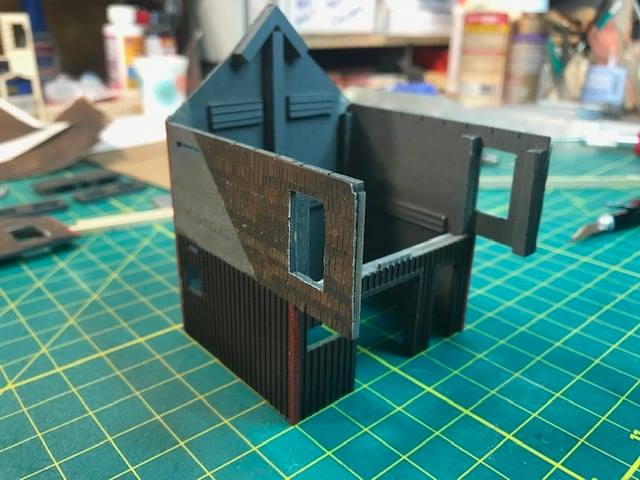
I cleared up a couple of projects on the modeling bench, so now I can begin work on a new project. This barn kit from American Model Builders is for a friend and fellow club member who is building a new layout. He wanted to include a barn, so I told him if he bought a quality laser cut wood kit, that I would be happy to build it for him. I'm just getting acclimated to this great kit which should prove to be a fun build. I have decided to add a base "foundation" and am trying to decide if it needs a second floor, both of which were not included. I will also add bracing so as to minimize warping when I paint it. This is a pretty big structure, measuring almost 6"x8". So far, I'm just dry fitting parts to get an idea of how I want to proceed.
I cleared up a couple of projects on the modeling bench, so now I can begin work on a new project. This barn kit from American Model Builders is for a friend and fellow club member who is building a new layout. He wanted to include a barn, so I told him if he bought a quality laser cut wood kit, that I would be happy to build it for him. I'm just getting acclimated to this great kit which should prove to be a fun build. I have decided to add a base "foundation" and am trying to decide if it needs a second floor, both of which were not included. I will also add bracing so as to minimize warping when I paint it. This is a pretty big structure, measuring almost 6"x8". So far, I'm just dry fitting parts to get an idea of how I want to proceed.


Ken Wheeler (club president)
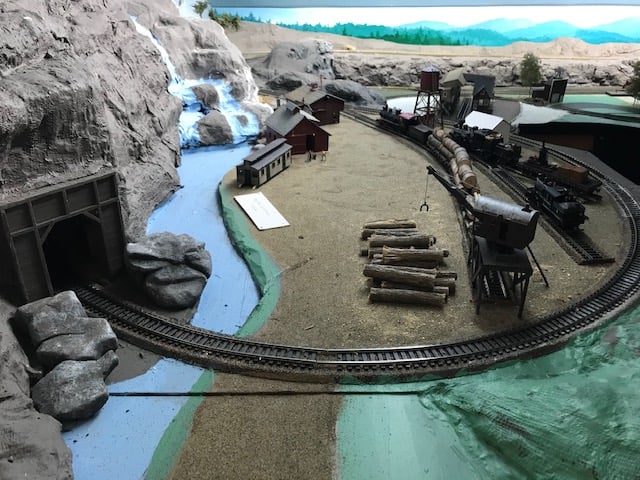
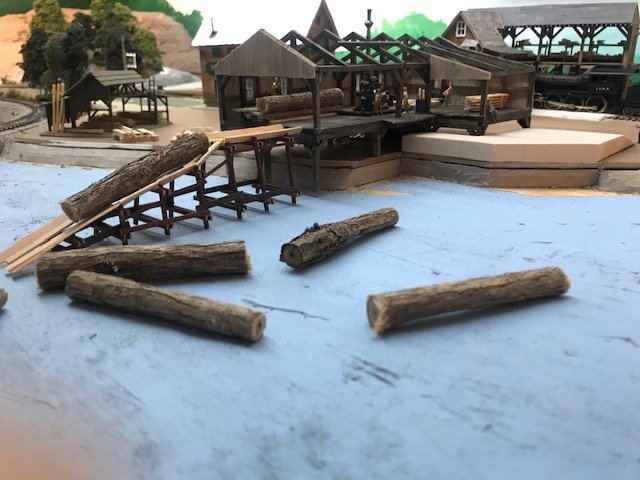
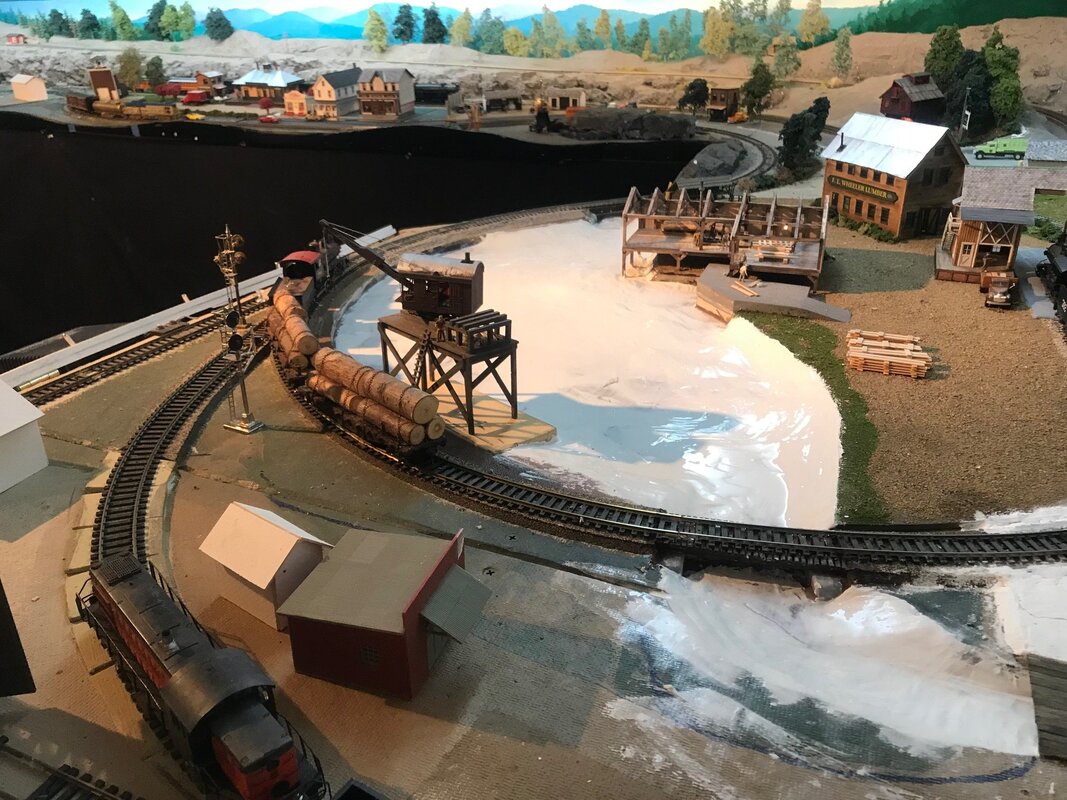
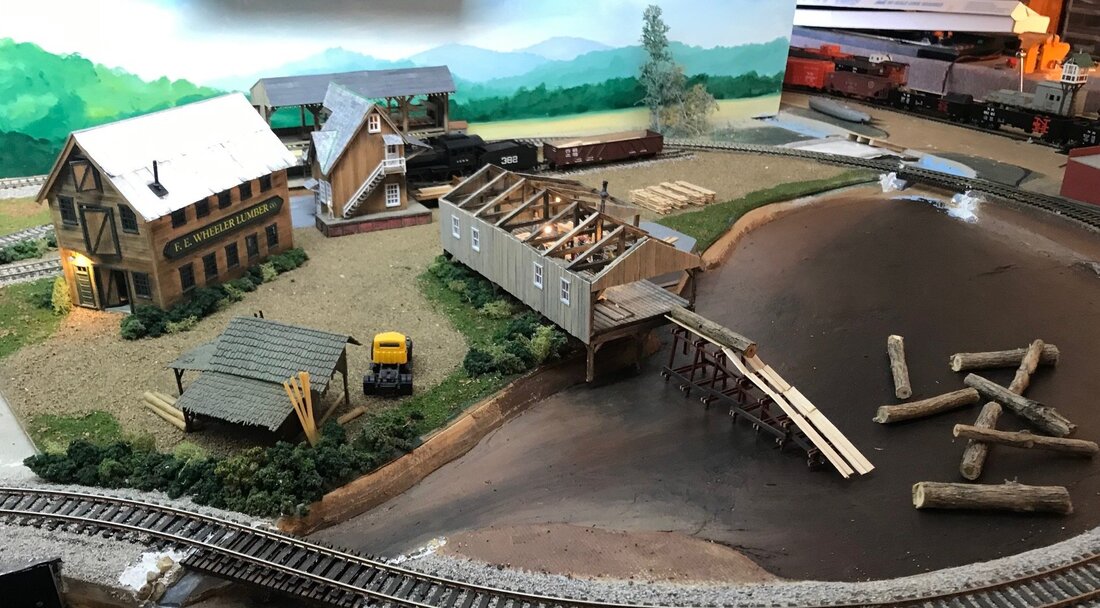
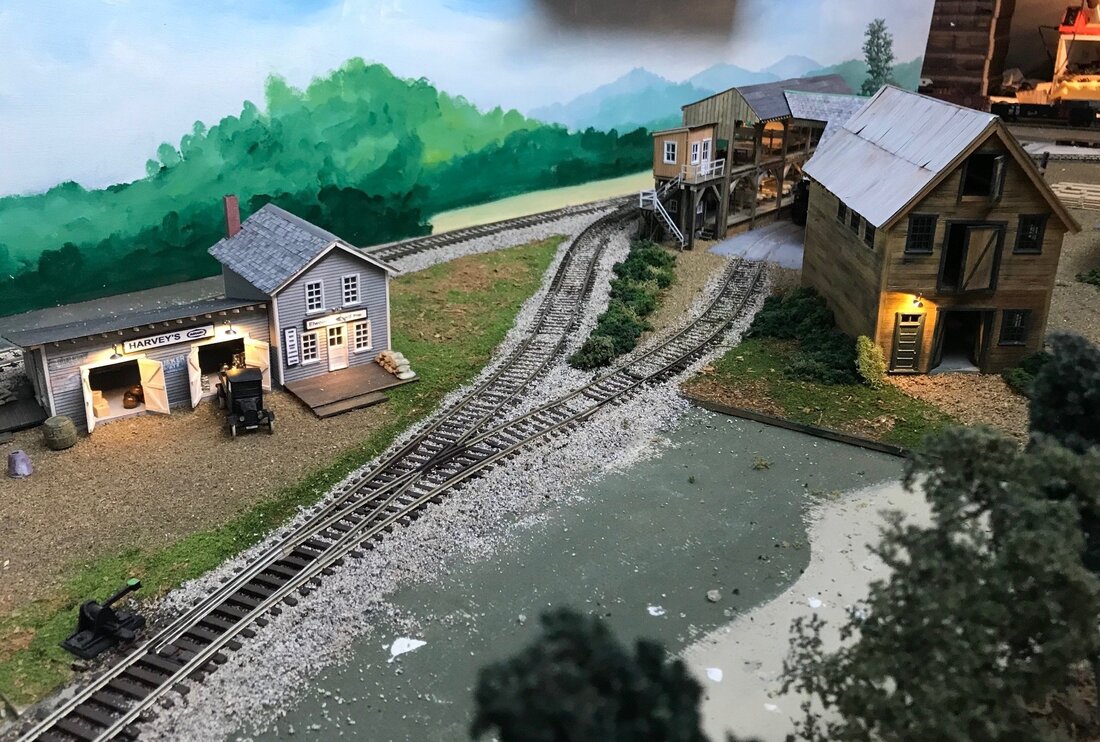
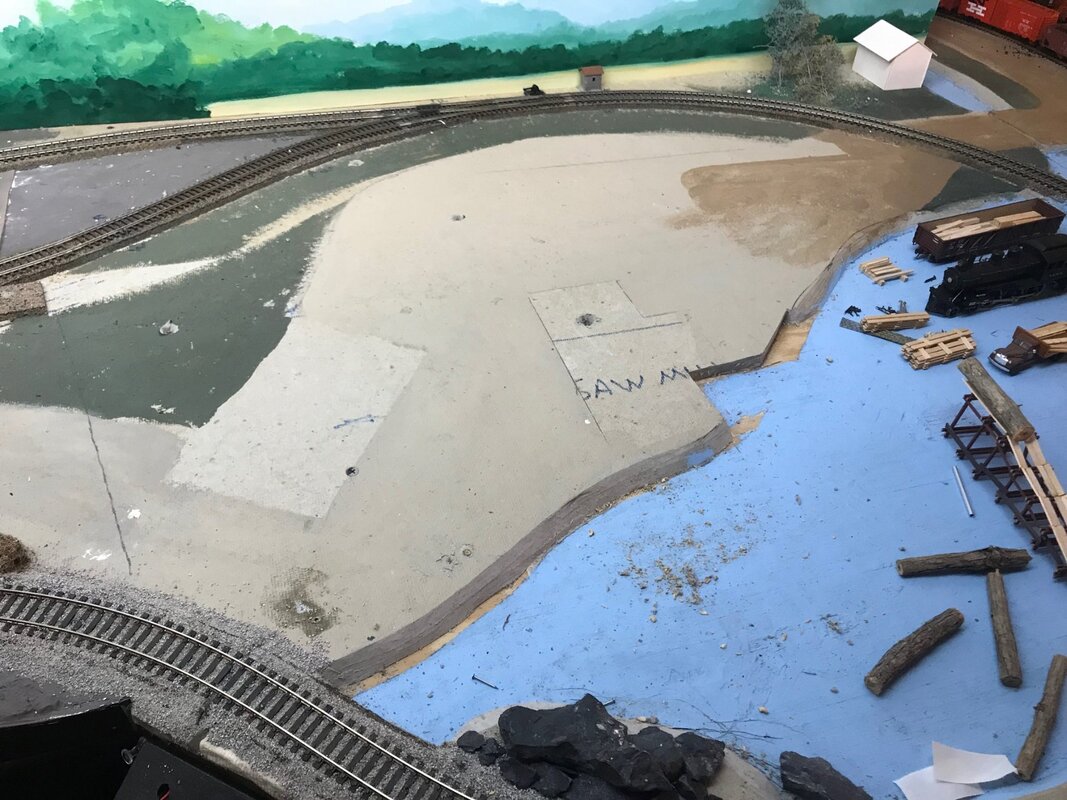
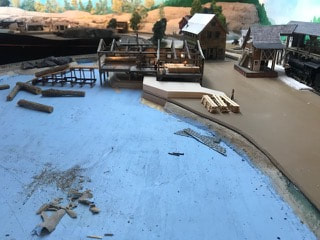
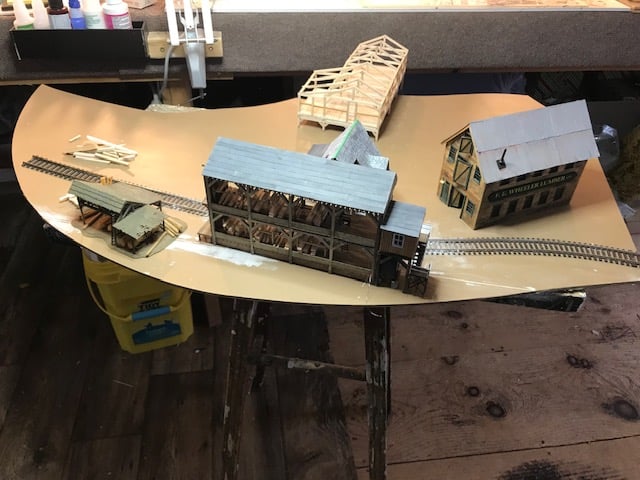
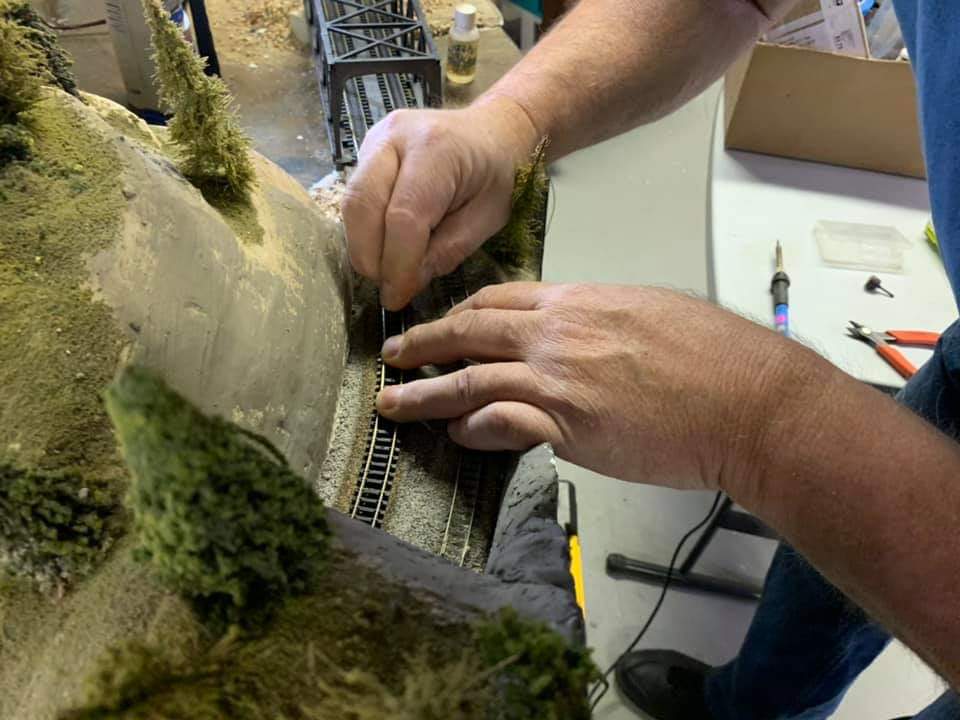
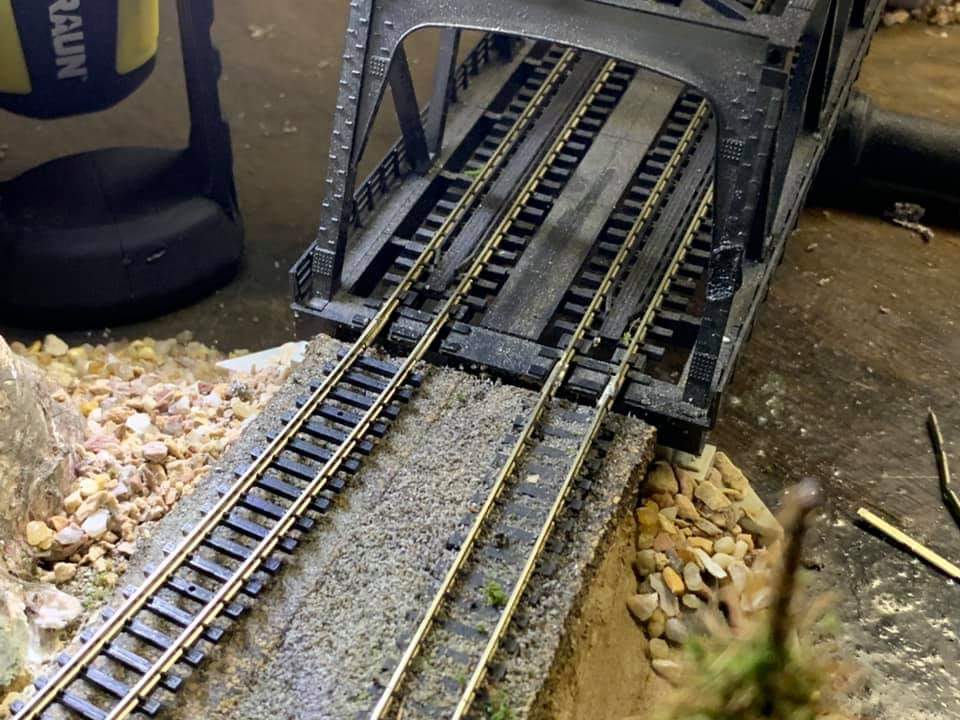
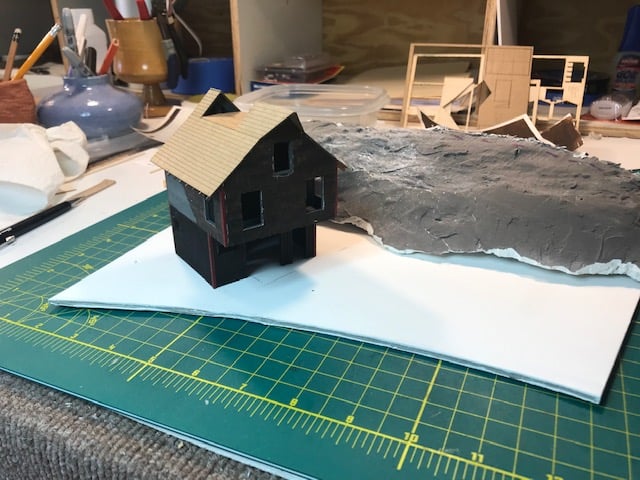
For those following my F.E. Wheeler Lumber Co. diorama, here is how it looks after placing it on the layout. I still have a lot of scenery work to do, but the diorama is now permanently in place. I still have to work out details for the log conveyor that brings the logs from the pond up to the mill, as well as build an offloading rig, both of which need to be worked out before I can lay down the water for the pond. I have never done a water feature before, so this will require some research as to the best method for water. I am trying out various colors for the bottom of the pond, tring to decide which will give me an authentic look.
For those following my F.E. Wheeler Lumber Co. diorama, here is how it looks after placing it on the layout. I still have a lot of scenery work to do, but the diorama is now permanently in place. I still have to work out details for the log conveyor that brings the logs from the pond up to the mill, as well as build an offloading rig, both of which need to be worked out before I can lay down the water for the pond. I have never done a water feature before, so this will require some research as to the best method for water. I am trying out various colors for the bottom of the pond, tring to decide which will give me an authentic look.
Ken Wheeler (club president)
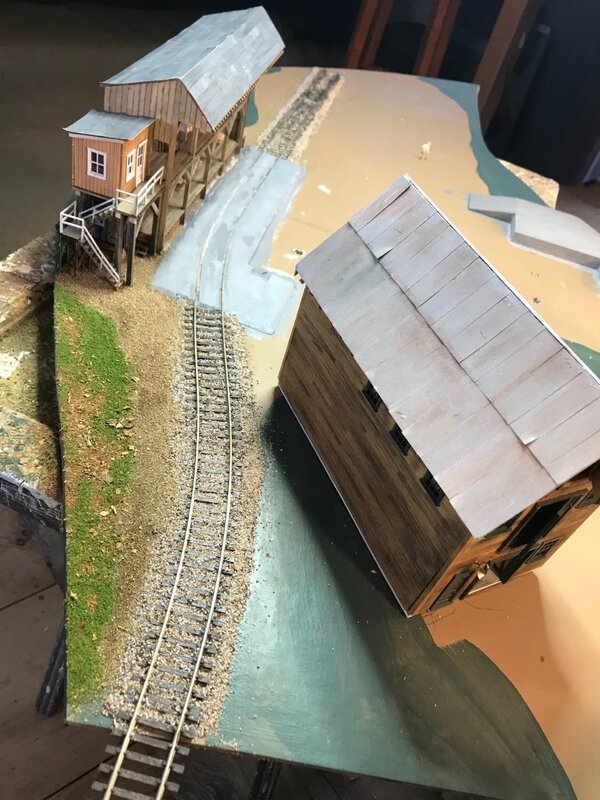
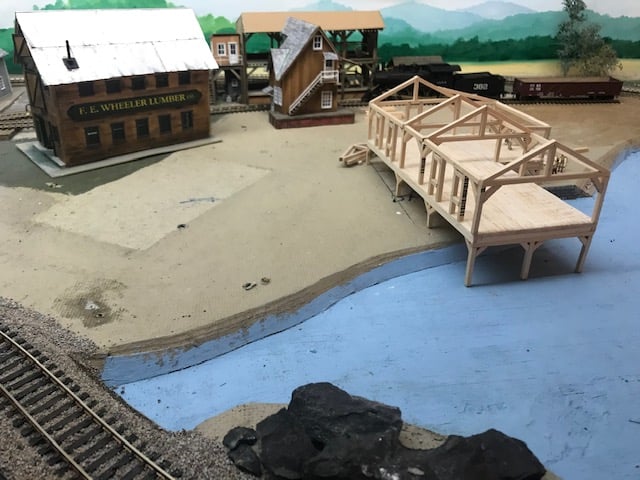
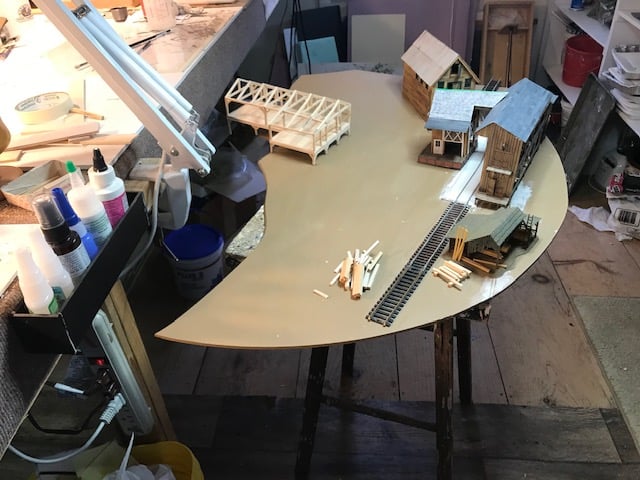
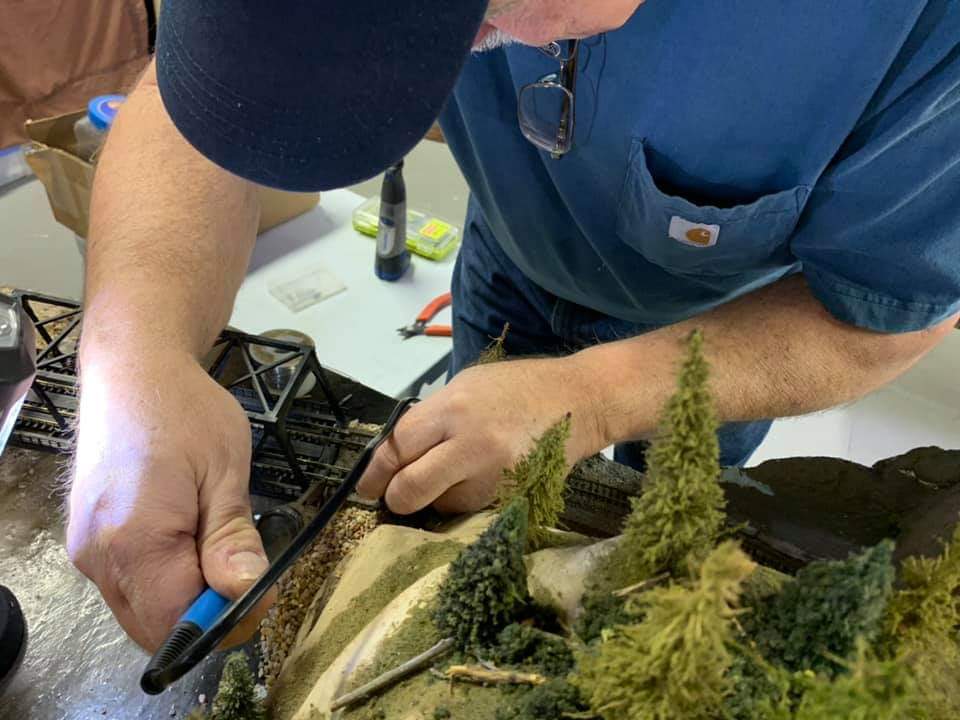
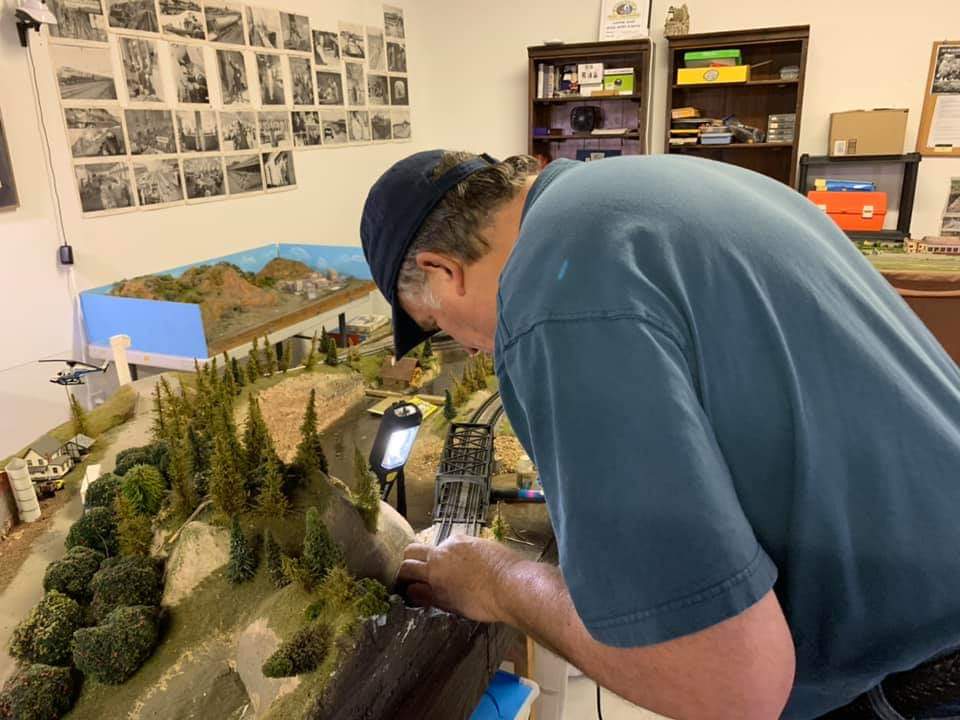
Today I am finally doing the finish scenery work to my F.E. Wheeler Lumber Co. Now that the lighting is all wired, I can begin doing ground covers, trees & shrubs. I always do my scenery as individual "dioramas" that are then placed and integrated into the layout. This allows me to do most of the finish work at the workbench, instead of leaning over the layout as my attic space is a bit tight. The buildings are a mix, the shipping office and storage shed are Bar Mills "Tory Hill Lumber Co.", the main office and millwork warehouse is an old Campbell kit, the sawmill is scratch built from plans I bought on line and the old shed is the only plastic piece, acquired at a train show. I included a photo of the space this will live on the layout. The total size is approx. 36" x 24". For the base, I use a Cresent brand artist illustration board which I seal with artist's gesso. This is a focal piece for my Adirondack logging and lumbering railroad. I will post pics once it is complete and placed on the layout.
Today I am finally doing the finish scenery work to my F.E. Wheeler Lumber Co. Now that the lighting is all wired, I can begin doing ground covers, trees & shrubs. I always do my scenery as individual "dioramas" that are then placed and integrated into the layout. This allows me to do most of the finish work at the workbench, instead of leaning over the layout as my attic space is a bit tight. The buildings are a mix, the shipping office and storage shed are Bar Mills "Tory Hill Lumber Co.", the main office and millwork warehouse is an old Campbell kit, the sawmill is scratch built from plans I bought on line and the old shed is the only plastic piece, acquired at a train show. I included a photo of the space this will live on the layout. The total size is approx. 36" x 24". For the base, I use a Cresent brand artist illustration board which I seal with artist's gesso. This is a focal piece for my Adirondack logging and lumbering railroad. I will post pics once it is complete and placed on the layout.

Ken Wheeler (club president)
Finished the Sweeney Todd Shoppe and it now sits permanently on the layout. Final ground covers and dressings will come later. Now to move on to getting the Lumber Co. wired up for lights.
Finished the Sweeney Todd Shoppe and it now sits permanently on the layout. Final ground covers and dressings will come later. Now to move on to getting the Lumber Co. wired up for lights.


Ken Wheeler (club president)
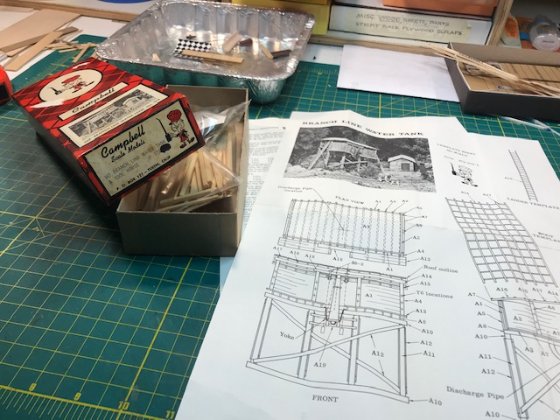
Picked up an old Campbell Kit, probably from the 60's, at the GTE Model Train Show in Albany over the weekend. I love these old wood kits and have several on my layout. This "Branch Line Water Tank and Shed" will go great with my logging/lumbering theme.
Picked up an old Campbell Kit, probably from the 60's, at the GTE Model Train Show in Albany over the weekend. I love these old wood kits and have several on my layout. This "Branch Line Water Tank and Shed" will go great with my logging/lumbering theme.
Ken Wheeler (club president)
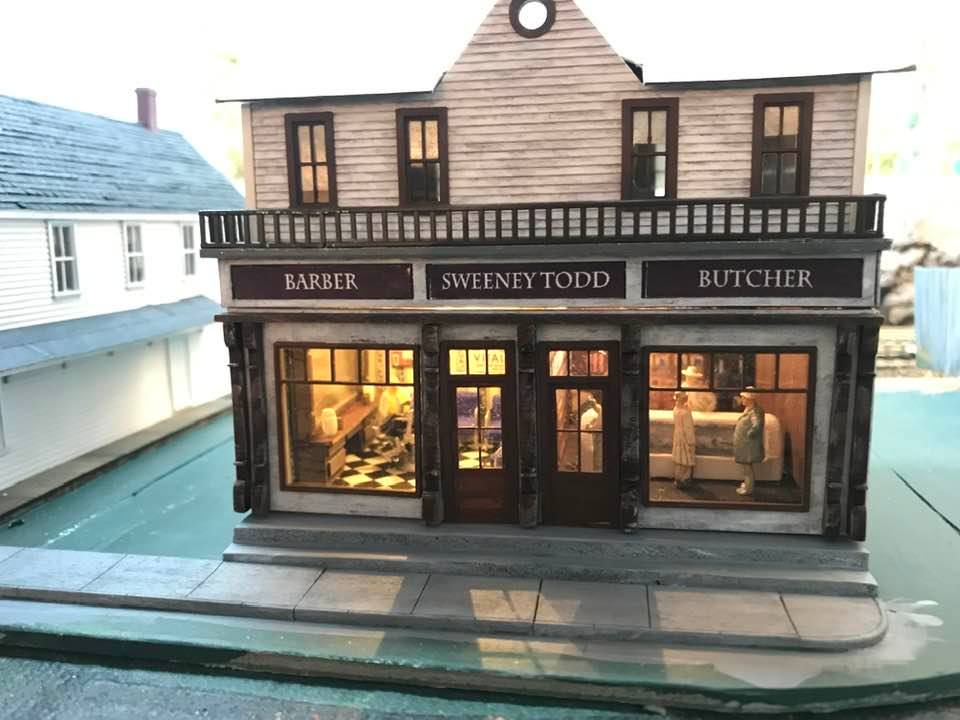
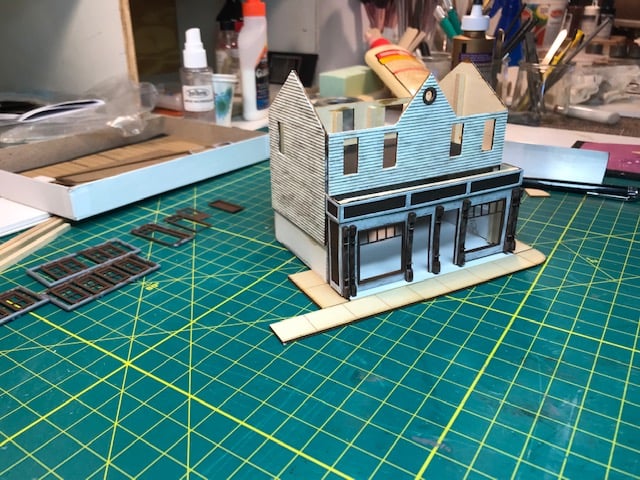
After a hiatus, I am finally finishing the Barber Shop/Butcher Shop building for the layout. Interior lighting is in but I still need the details for the Butcher's side, some signage for the front and then get the roof done. Today I'm checking the exact placement and seeing how it will fit with the other buildings. Sometimes I spend too much time over thinking the small stuff, which is why nothing ever gets done...and I got the interior details done and lighting hooked up on the Sweeney Todd shoppe.
After a hiatus, I am finally finishing the Barber Shop/Butcher Shop building for the layout. Interior lighting is in but I still need the details for the Butcher's side, some signage for the front and then get the roof done. Today I'm checking the exact placement and seeing how it will fit with the other buildings. Sometimes I spend too much time over thinking the small stuff, which is why nothing ever gets done...and I got the interior details done and lighting hooked up on the Sweeney Todd shoppe.

Ken Wheeler (club president)
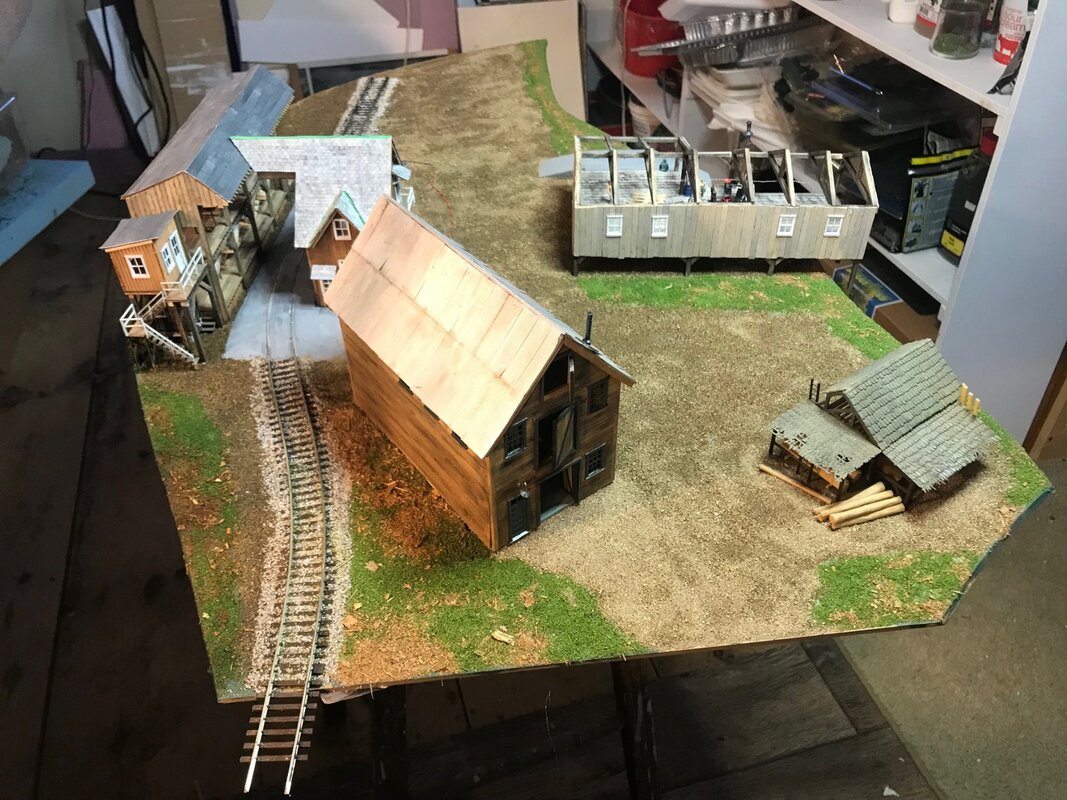
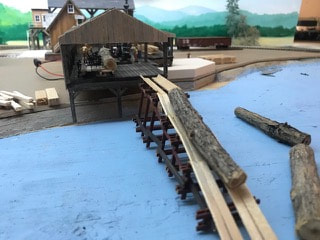
Continuing to build and add details to the sawmill. I am working out how I'll get the logs from the pond up into the mill. Yet with each new element, comes another logistic I hadn't thought about. I have to build some plausible provision for the wood fuel that is used in the steam donkey power unit, as well as a water line from the pond. Unfortunately this structure is a bit too small for everything. Should have built a bigger mill.
Continuing to build and add details to the sawmill. I am working out how I'll get the logs from the pond up into the mill. Yet with each new element, comes another logistic I hadn't thought about. I have to build some plausible provision for the wood fuel that is used in the steam donkey power unit, as well as a water line from the pond. Unfortunately this structure is a bit too small for everything. Should have built a bigger mill.

From Ken Wheeler (Club President)
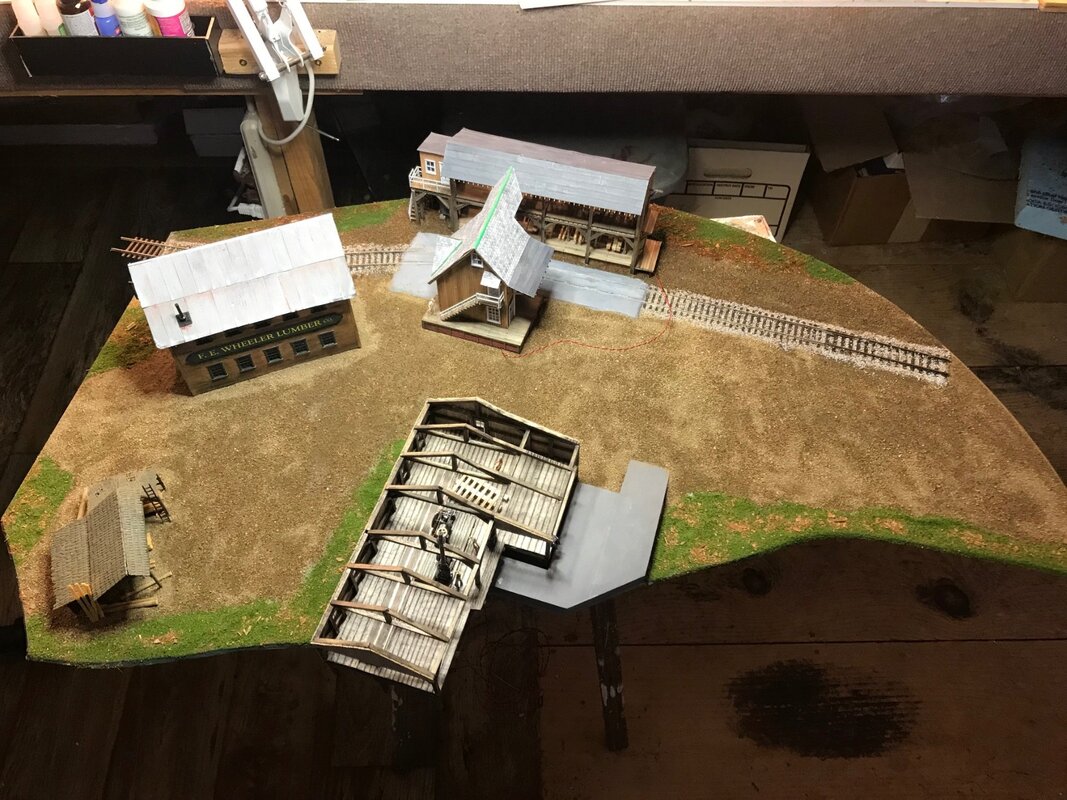
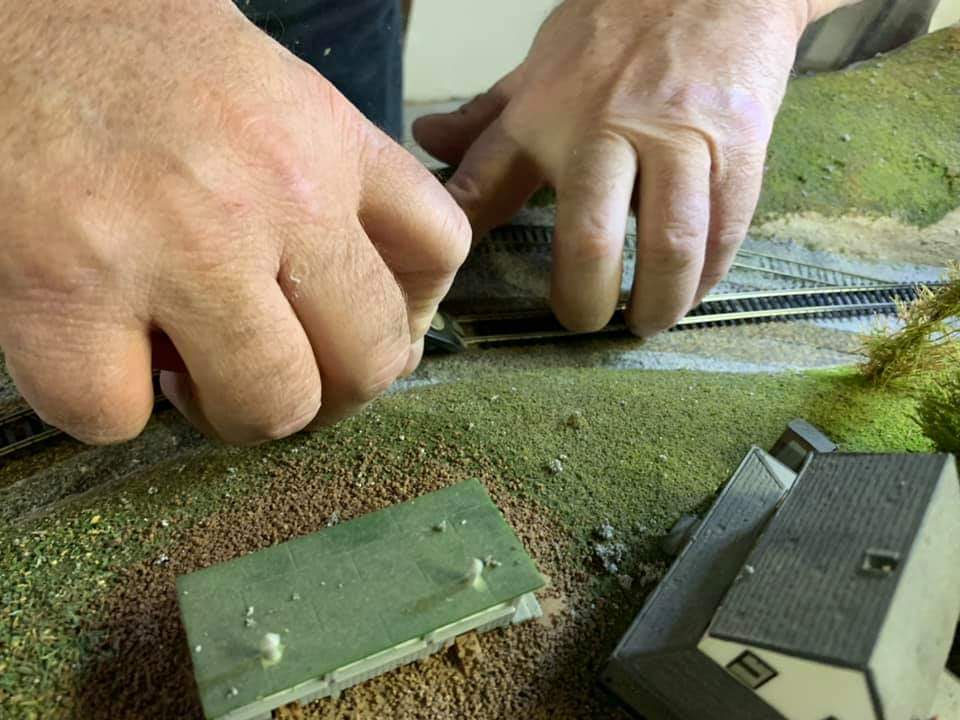
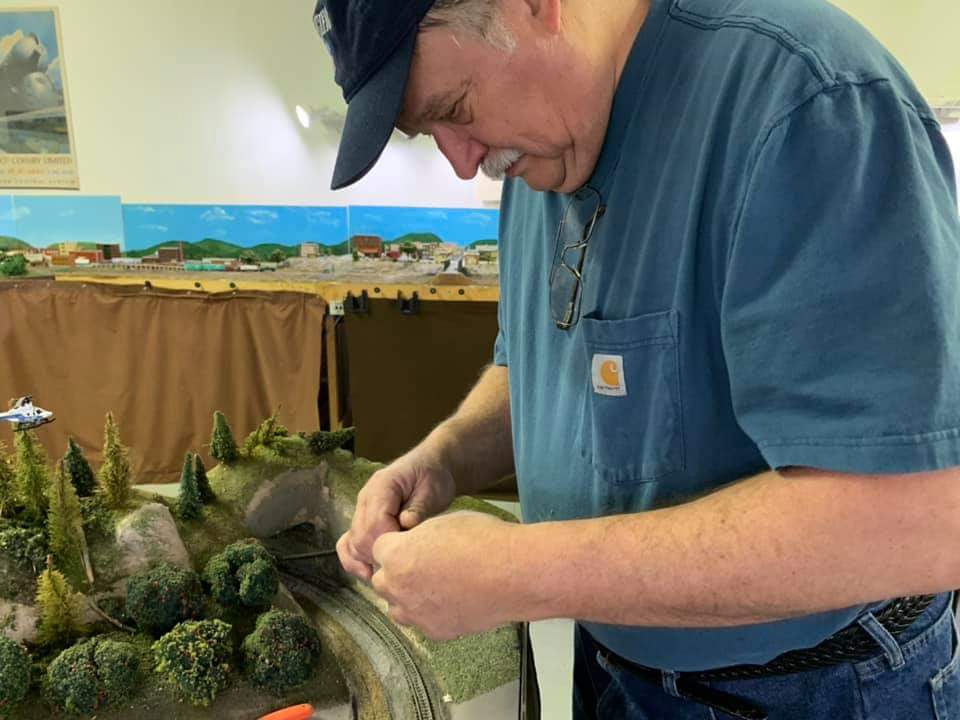
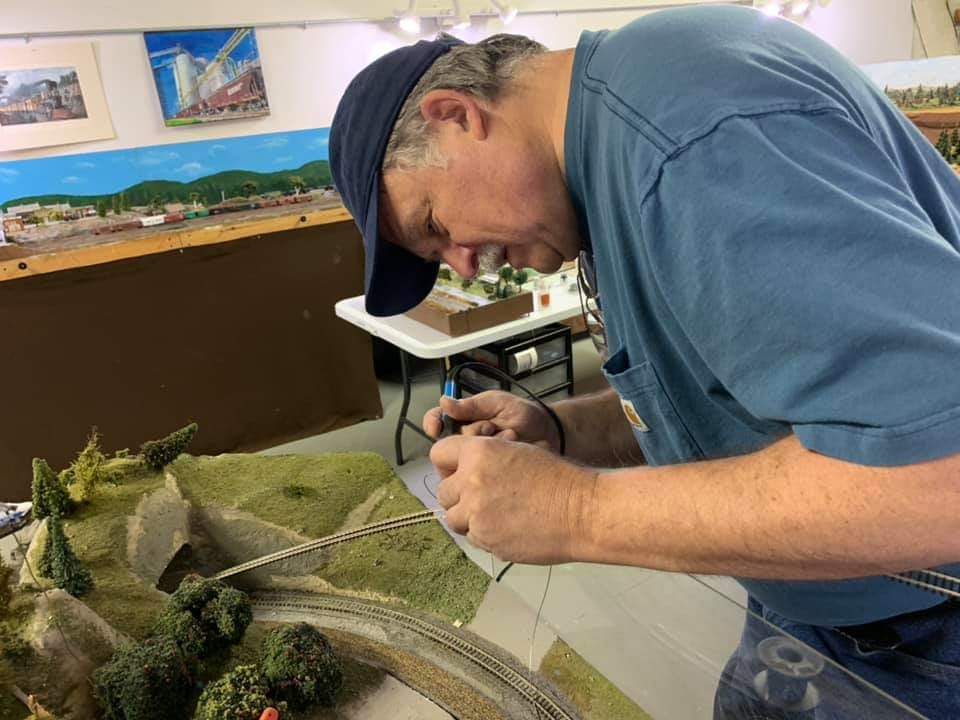
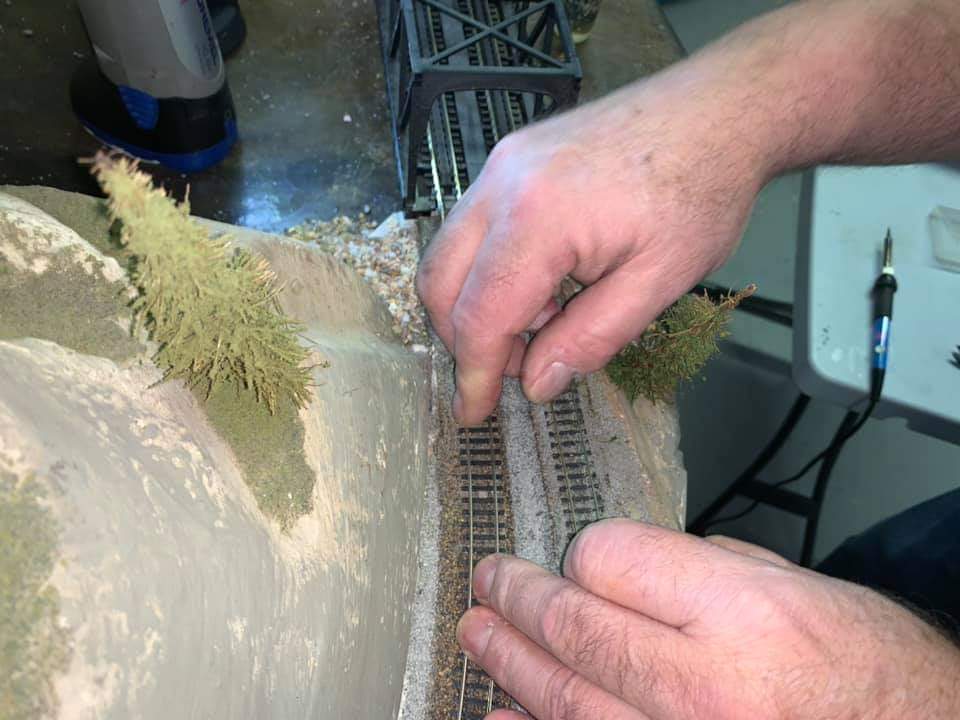
I am beginning the diorama for the sawmill/lumber company. I have been building laser wood and scratch built wood structures as individual dioramas that I can seam into the layout, so that if I ever want to move the layout or rebuild it later, these structures and scenes would be easily removed without destroying them and the details surrounding them. This one will have multiple structures, so it will be my most challenging so far. I am posting photos of my process as I go along and will give a brief description of each one. This may not be how others do scenery, but it does allow me to do the details on the workbench, rather than leaning over the layout.
1. Here is how I will layout the structures
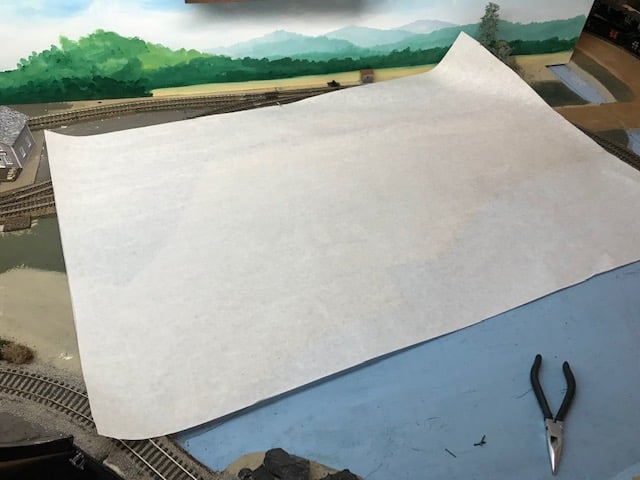
2. After removing the structures, I lay out butcher paper in the area that will be the total diorama.
3. The shape is traced on the paper so it can be transferred to the board base.
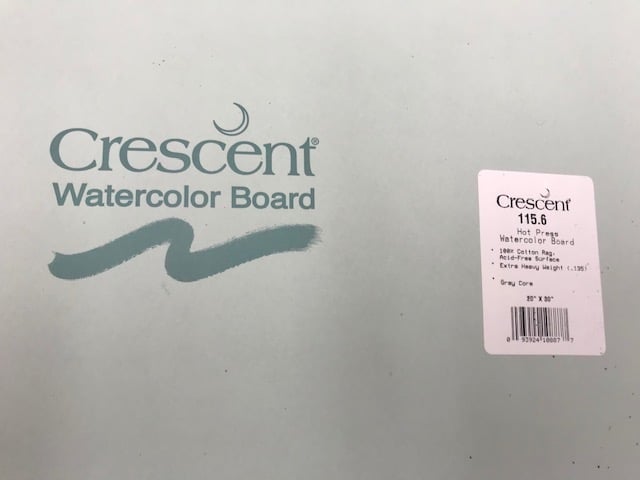
4. I use a Crescent brand artist's watercolor board which is about 5/16" thick and has an archival surface that will accept most waterborne paints.
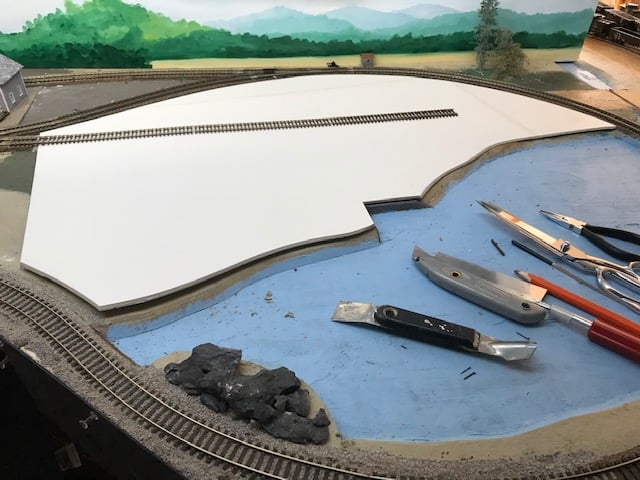
5. The 20" x 30" is just slightly too small, soo I will add pieces with archival tape and white glue.
6. The pattern is traced on and then cut to shape.
7. Test fitting the board to the layout. Once I am happy with the fit, I will begin the build. This process allows me to work on the details on the workbench rather than leaning over the layout. Once completed it can be put in place and hopefully have scenery added that will make it look seamless.
I am beginning the diorama for the sawmill/lumber company. I have been building laser wood and scratch built wood structures as individual dioramas that I can seam into the layout, so that if I ever want to move the layout or rebuild it later, these structures and scenes would be easily removed without destroying them and the details surrounding them. This one will have multiple structures, so it will be my most challenging so far. I am posting photos of my process as I go along and will give a brief description of each one. This may not be how others do scenery, but it does allow me to do the details on the workbench, rather than leaning over the layout.
1. Here is how I will layout the structures
2. After removing the structures, I lay out butcher paper in the area that will be the total diorama.
3. The shape is traced on the paper so it can be transferred to the board base.
4. I use a Crescent brand artist's watercolor board which is about 5/16" thick and has an archival surface that will accept most waterborne paints.
5. The 20" x 30" is just slightly too small, soo I will add pieces with archival tape and white glue.
6. The pattern is traced on and then cut to shape.
7. Test fitting the board to the layout. Once I am happy with the fit, I will begin the build. This process allows me to work on the details on the workbench rather than leaning over the layout. Once completed it can be put in place and hopefully have scenery added that will make it look seamless.


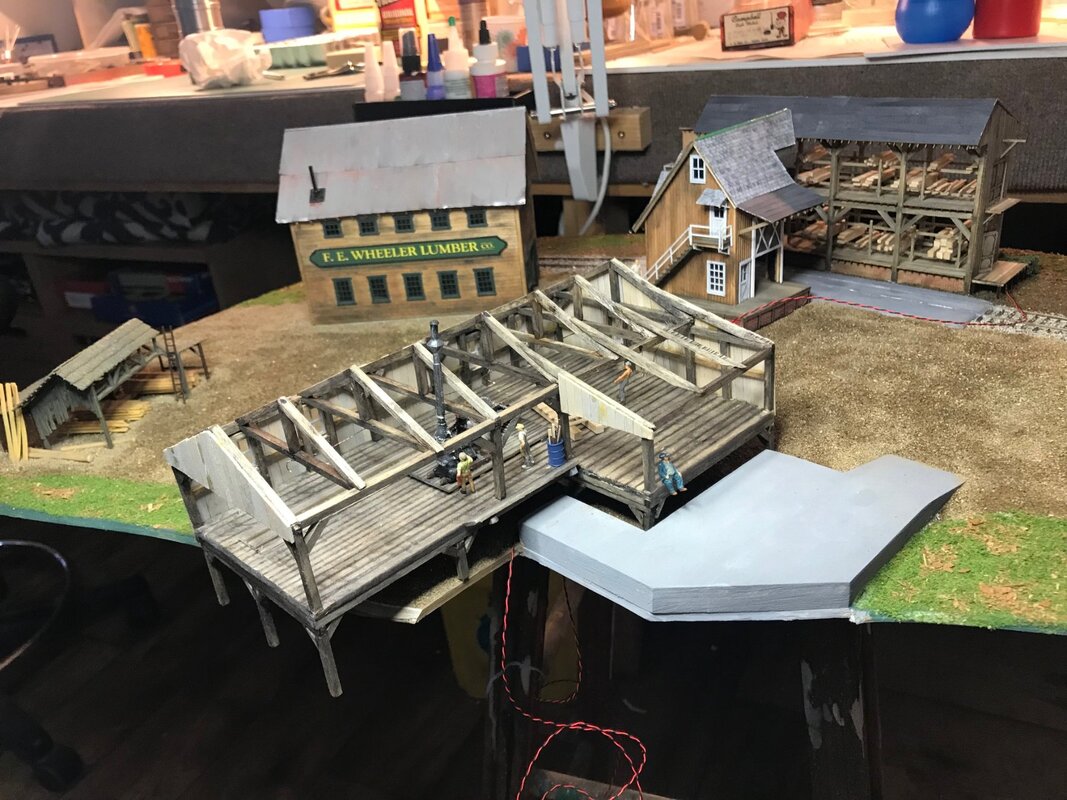
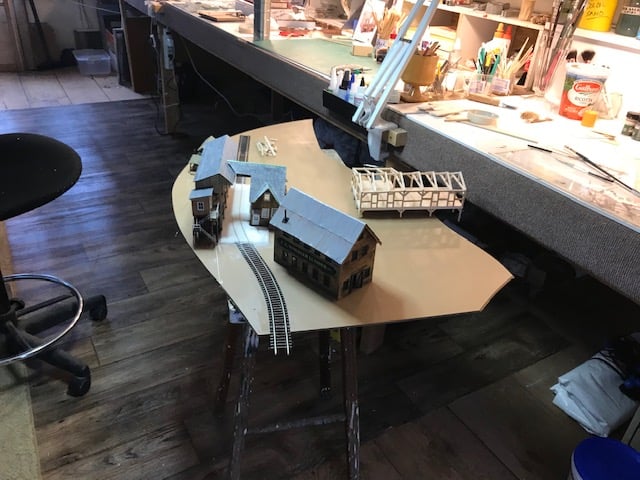
Ken Wheeler (Club President) Here is this week's "Workbench Wednesday" update for the lumber company diorama. I have painted the board, applied the concrete to where the track passes between the structures, added lighting to two of the buildings and finished the trusses on the sawmill. Here I am test fitting everything, including where it will live on the layout. So far everything is going as planned. This scene will need a lot of lumber stacks and yard details. Next I'll tackle the sawmill castings kit.
From Ken Wheeler (club president)
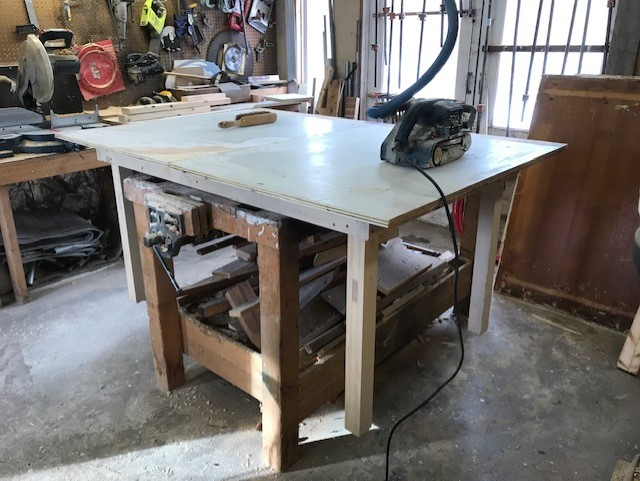
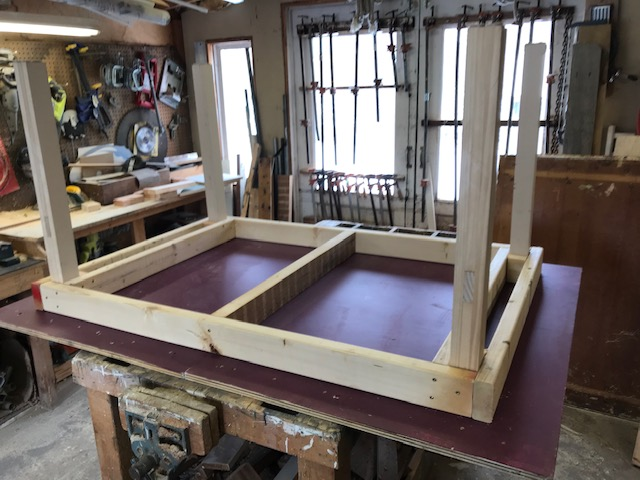
"Making a new work table for the HO scale room. The legs were salvaged from an N scale layout donation the club received
which had to be removed to make the layout more trans portable and the rest of the materials were scraps and leftover flooring from my shop."
Waste not, want not! Here at the club we make use of every scrap we can.


Ken Wheeler (Club President) I started another small kit by Banta Modelworks, they call the B&O Hotel. This will be the "Stumble Inn" tavern on my layout. I am also doing a vertical board & batten (which is more indicative of the Adirondacks), instead of the horizontal siding they planned. This little kit is small but challenging. It should be a quick build, while I wait decisions on the current project. As you can see, my work space can get a bit crowded. Keeping everything separated is key.
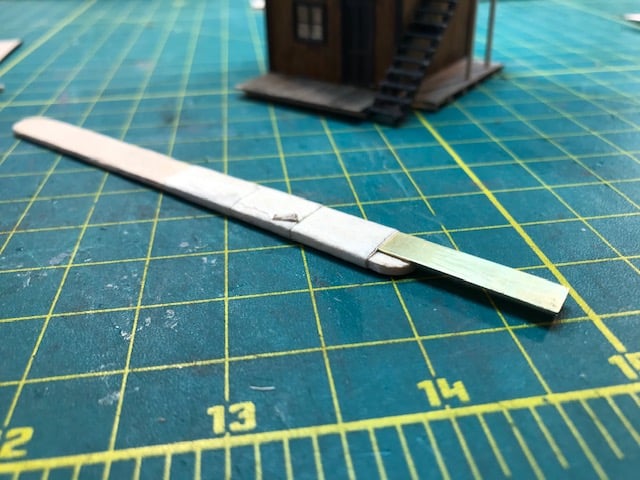
I am beginning to get confidence as a modeler and adding scratch building to my structures. I didn't like the bracing for the upper deck and stairs that they designed for this kit, so I added a decking piece I had left over from another build and am working on a less cumbersome and more realistic support and railing system. I also tried a trick I learned from a fellow club member. I used double faced scotch tape for the glazing. Being sticky, it attracts just enough to look like real dirty glass and it made it easy to add tissue paper for the shades. I am including a pic of a tool I made. This homemade mini putty knife, is invaluable for wiping off wet glue and pushing and nudging parts into place. This is just a scrap of thin brass left over from some I bought at the hardware store for another project. I taped it to a craft stick and it works great!
I am beginning to get confidence as a modeler and adding scratch building to my structures. I didn't like the bracing for the upper deck and stairs that they designed for this kit, so I added a decking piece I had left over from another build and am working on a less cumbersome and more realistic support and railing system. I also tried a trick I learned from a fellow club member. I used double faced scotch tape for the glazing. Being sticky, it attracts just enough to look like real dirty glass and it made it easy to add tissue paper for the shades. I am including a pic of a tool I made. This homemade mini putty knife, is invaluable for wiping off wet glue and pushing and nudging parts into place. This is just a scrap of thin brass left over from some I bought at the hardware store for another project. I taped it to a craft stick and it works great!


Ken Wheeler (Club President)
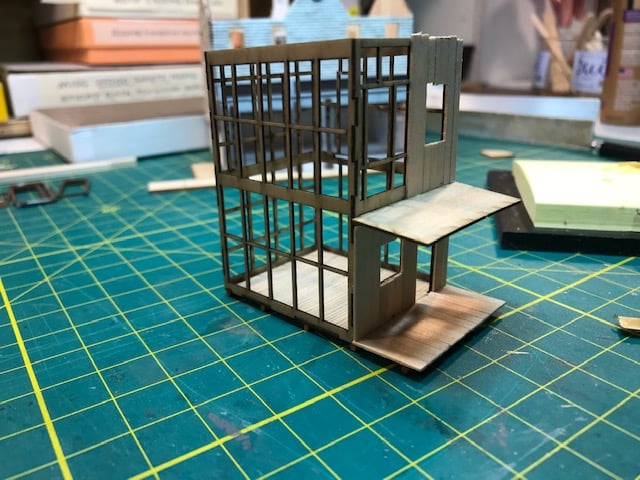
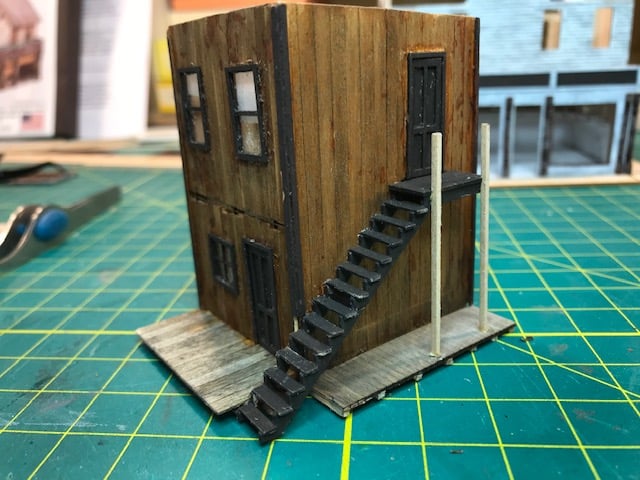
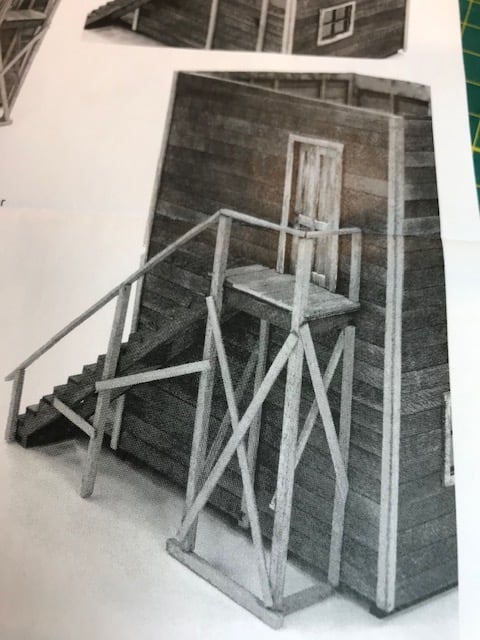
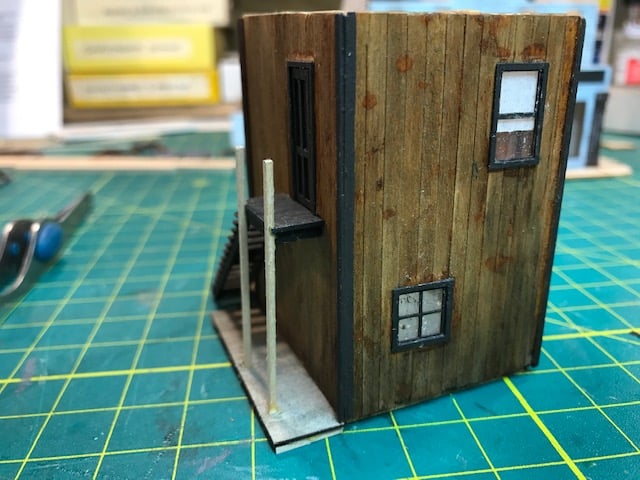
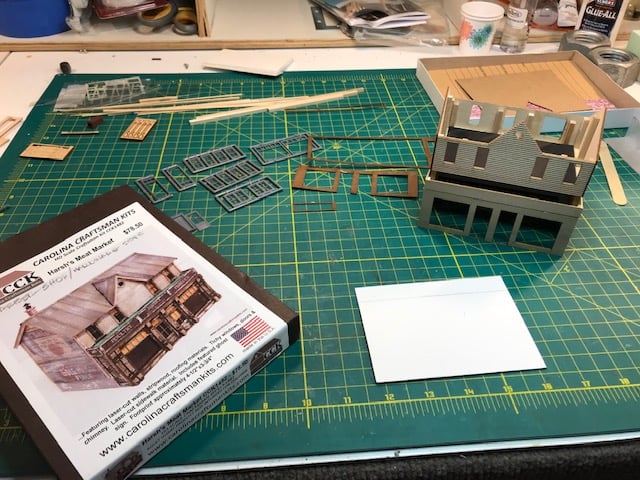
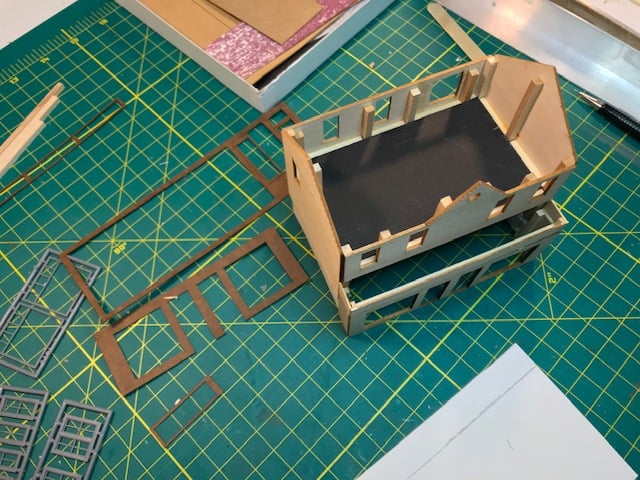
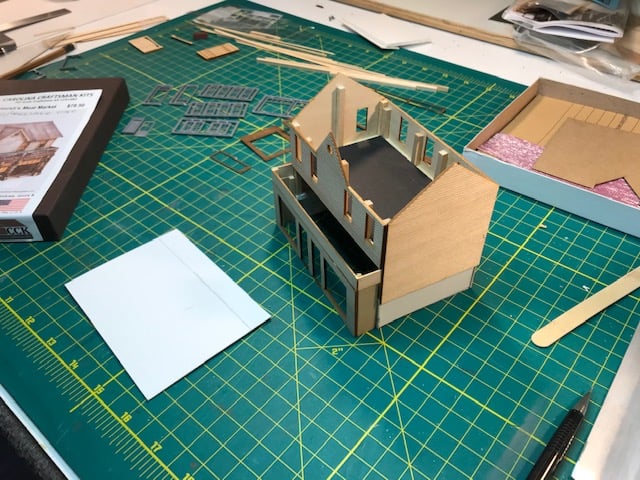
After a hiatus I am getting back to the Carolina Craftsman Kit's "Harsh's Meat Market" This is an older kit, no longer in production, that I was lucky enough to receive as one of the prizes from the HO Model Railroad Facebook Group's diorama contest last year. I am doing a bit of kit bashing (making alterations) with this one and adding a floor in the second story, installing interior lighting and adding apartment entrances with outside stairs to each side of the structure. I think the main level will be a side by side barbershop & small hardware store.
This is a sweet kit with nice details. It will look great in my Adirondack Hamlet. I am now at the point where I will be painting and staining before proceeding.
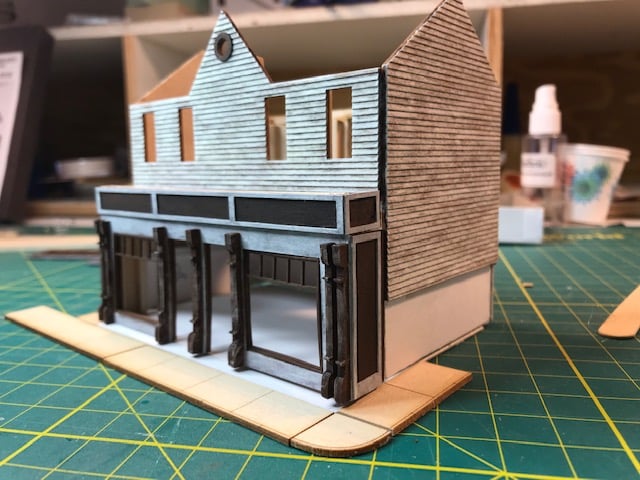
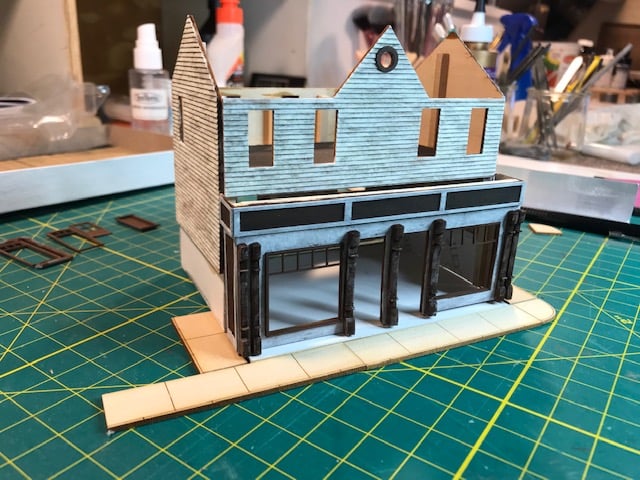
I don't normally weather my buildings like most modelers do. I don't want my miniature community to look that old and run down, however, with this one, I am trying some peeling/faded paint techniques. I am happy with it so far. Now I need to decide if I am going to do interior details. If I do, then I will need to construct a center interior wall. The front windows are large enough to show off some great interiors and the upper transoms need colored glass. I think I will put blinds in the upstairs apartment windows, so I don't have to do interiors there, just some lighting. Sometimes I don't know when to stop...
After a hiatus I am getting back to the Carolina Craftsman Kit's "Harsh's Meat Market" This is an older kit, no longer in production, that I was lucky enough to receive as one of the prizes from the HO Model Railroad Facebook Group's diorama contest last year. I am doing a bit of kit bashing (making alterations) with this one and adding a floor in the second story, installing interior lighting and adding apartment entrances with outside stairs to each side of the structure. I think the main level will be a side by side barbershop & small hardware store.
This is a sweet kit with nice details. It will look great in my Adirondack Hamlet. I am now at the point where I will be painting and staining before proceeding.
I don't normally weather my buildings like most modelers do. I don't want my miniature community to look that old and run down, however, with this one, I am trying some peeling/faded paint techniques. I am happy with it so far. Now I need to decide if I am going to do interior details. If I do, then I will need to construct a center interior wall. The front windows are large enough to show off some great interiors and the upper transoms need colored glass. I think I will put blinds in the upstairs apartment windows, so I don't have to do interiors there, just some lighting. Sometimes I don't know when to stop...


Ken Wheeler (club president)
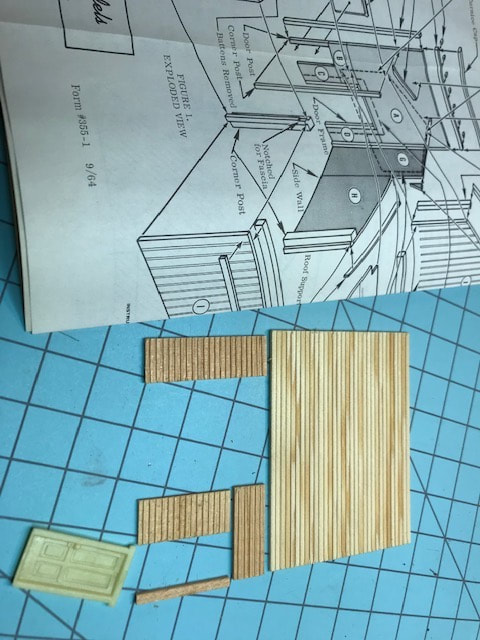
Making progress on the Firehouse kit. Walls are up! Next step is to decide on color and do some pre-painting before proceeding. The trick will be to get this painted without it warping. This really thin pine is old and so dry, that it will warp easily when wet paint is applied. Hopefully, with it partially built, it will limit how much warping will occur. Airbrushing multiple, very thin coats might be the best option.
Making progress on the Firehouse kit. Walls are up! Next step is to decide on color and do some pre-painting before proceeding. The trick will be to get this painted without it warping. This really thin pine is old and so dry, that it will warp easily when wet paint is applied. Hopefully, with it partially built, it will limit how much warping will occur. Airbrushing multiple, very thin coats might be the best option.

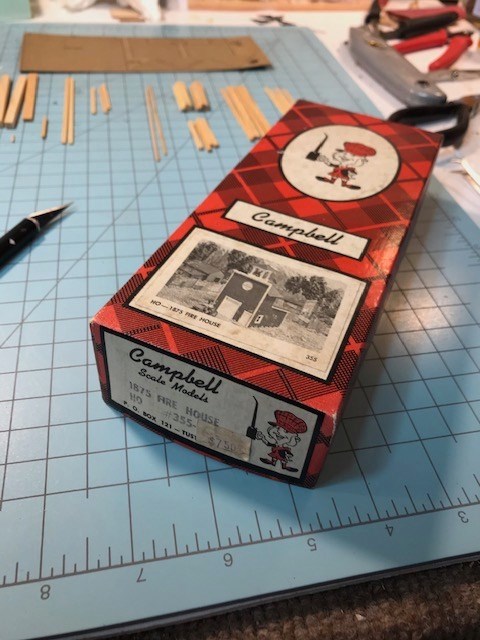
Ken Wheeler (club president)
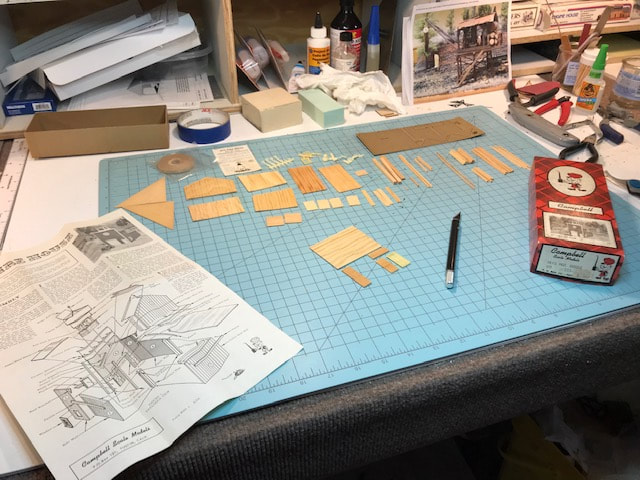
Today on the workbench I am starting another vintage Campbell kit. This one, #355 is an 1875 era firehouse. This was a gift from a friend and fellow club member. I love these old wood kits. They can be a bit intimidating, but if I lay everything out and take my time, the results are great. This will fit well in my fictitious, early 1920's era, Adirondack Hamlet of "Kennydale". I'll post pics as I go along, in case anyone is interested.
Today on the workbench I am starting another vintage Campbell kit. This one, #355 is an 1875 era firehouse. This was a gift from a friend and fellow club member. I love these old wood kits. They can be a bit intimidating, but if I lay everything out and take my time, the results are great. This will fit well in my fictitious, early 1920's era, Adirondack Hamlet of "Kennydale". I'll post pics as I go along, in case anyone is interested.

Ken Wheeler (club president)
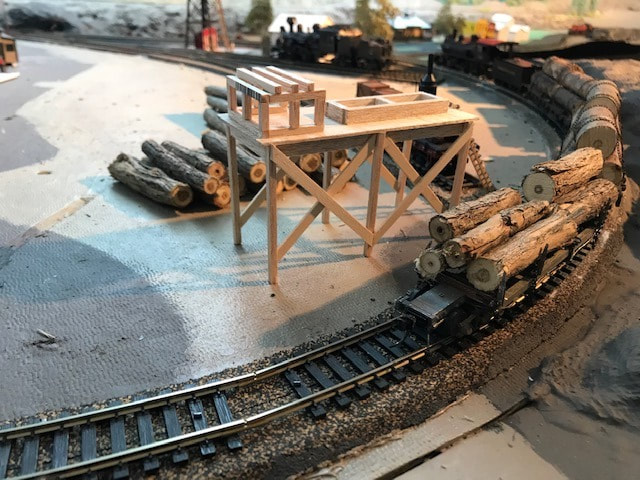
On the modeling bench today I am scratch building a platform for a "Barnhart" style, steam log loader, to use at the logging camp on the Adirondack Timberline RR. I have a steam shovel kit that I hope I can adapt to work as the Barnhart loader. This steam powered loader will sit up on the platform next to the track, lift logs and load them onto the cars. Years ago, creative ingenuity and adapting what was available, was what made early industries like logging possible.
On the modeling bench today I am scratch building a platform for a "Barnhart" style, steam log loader, to use at the logging camp on the Adirondack Timberline RR. I have a steam shovel kit that I hope I can adapt to work as the Barnhart loader. This steam powered loader will sit up on the platform next to the track, lift logs and load them onto the cars. Years ago, creative ingenuity and adapting what was available, was what made early industries like logging possible.


Mike Romanowski (vice president)
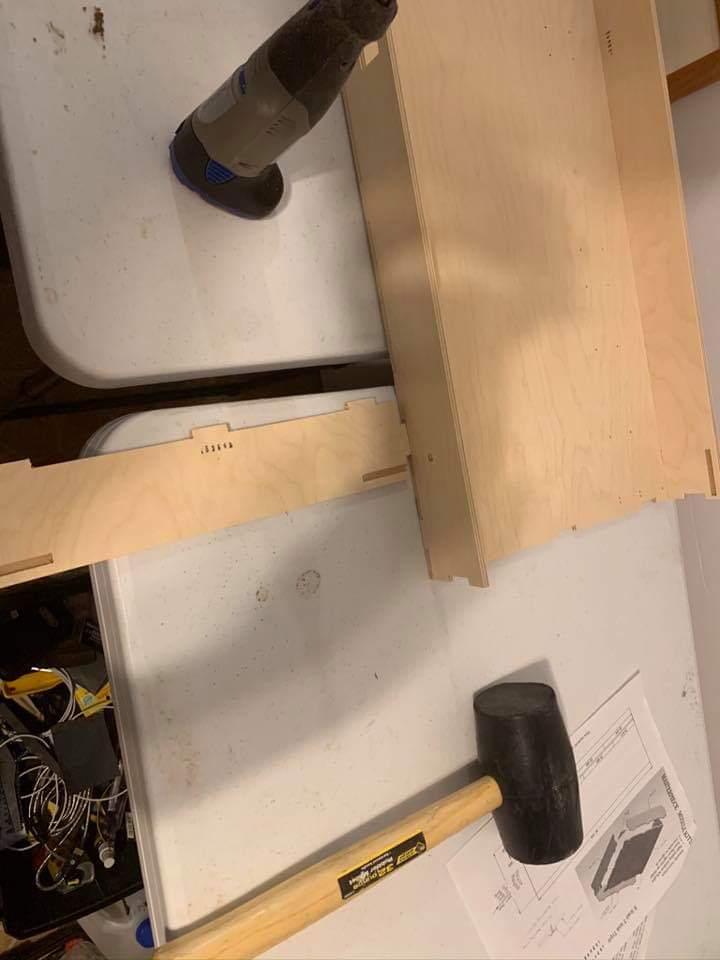
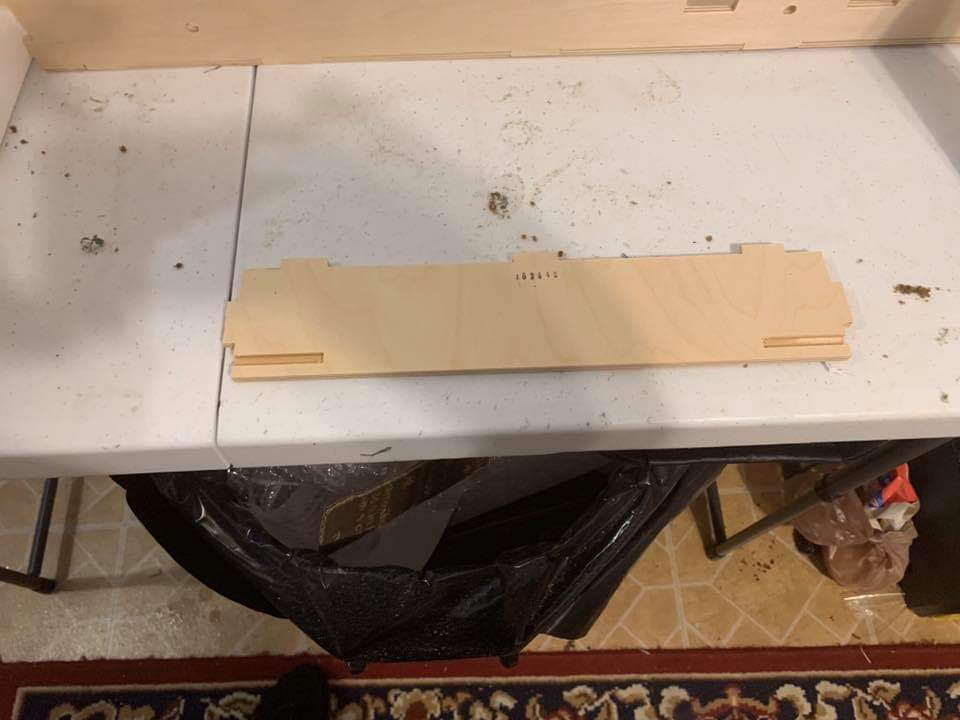
Starting work on two 3 ft TTrak modules depicting an auto train operation. Using masterpiece modules kits and Kato track.
Starting work on two 3 ft TTrak modules depicting an auto train operation. Using masterpiece modules kits and Kato track.


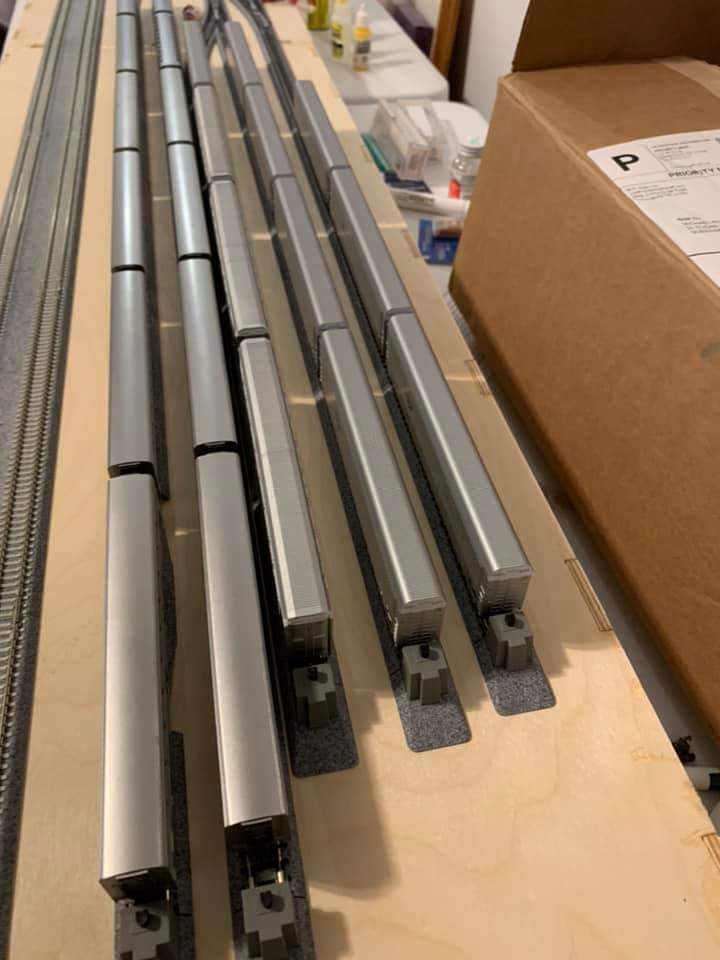
Adding track and the cars to see how the auto train will look.
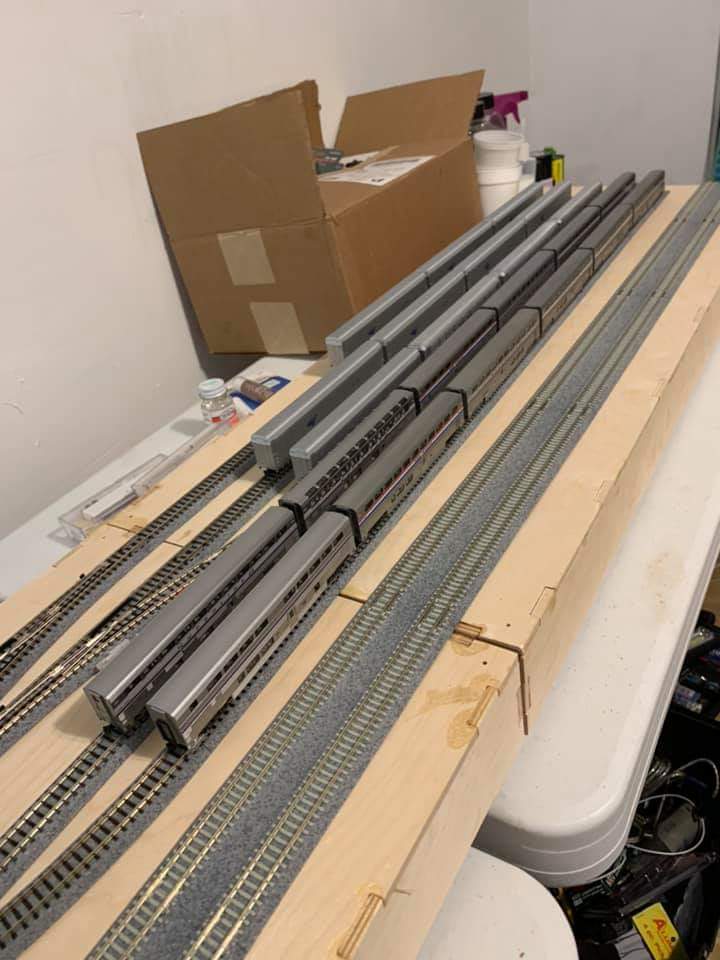

Fortunately my son Matthew showed up to help me last night. Together we replaced the inside track on the farm module. It’s now smooth sailing for passenger trains. No derailments. I will finish the work Wednesday.
Ken Wheeler (club president)
For those who might have been following my earlier post on the Campbell "Firehouse" kit. I am almost done. The painting is complete and today I am "shingling" the roof panels. These are made from card stock and pre-printed with glue lines for applying the strips of "shingles". The shingles are just a roll of gummed paper that has cuts along one edge which will form the shingles. Cutting the proper lengths from the roll, you wet the uncut side of each strip and lay them on the card stock panels, working from the bottom up. I am not sure if I will paint these or leave them the color they are. I will make up a sample roof from left over material to test how applying paint will affect the paper shingles. Wet paint might make a mess and I don't want that.
For those who might have been following my earlier post on the Campbell "Firehouse" kit. I am almost done. The painting is complete and today I am "shingling" the roof panels. These are made from card stock and pre-printed with glue lines for applying the strips of "shingles". The shingles are just a roll of gummed paper that has cuts along one edge which will form the shingles. Cutting the proper lengths from the roll, you wet the uncut side of each strip and lay them on the card stock panels, working from the bottom up. I am not sure if I will paint these or leave them the color they are. I will make up a sample roof from left over material to test how applying paint will affect the paper shingles. Wet paint might make a mess and I don't want that.

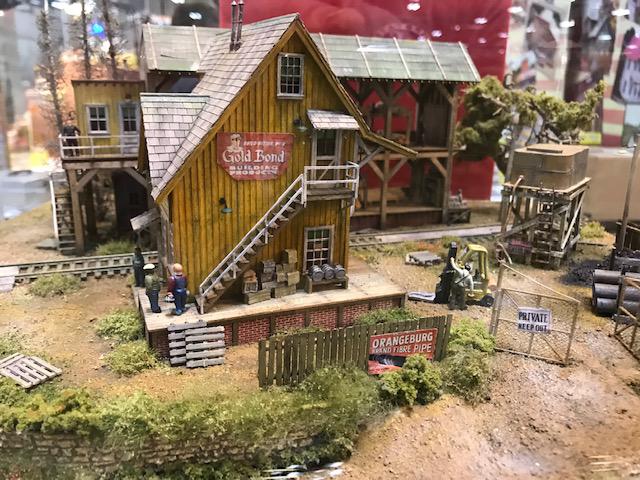
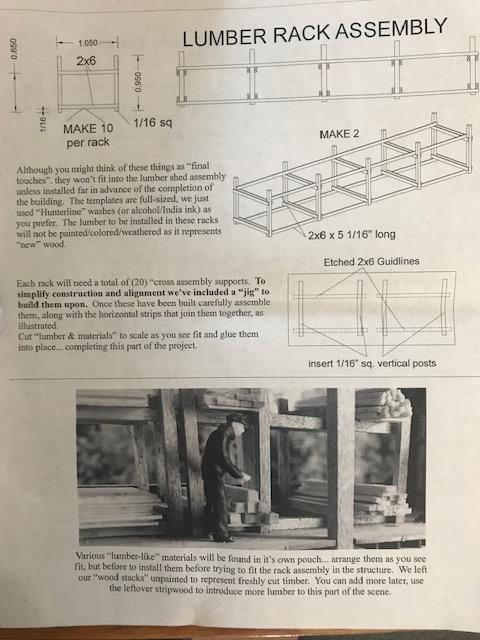
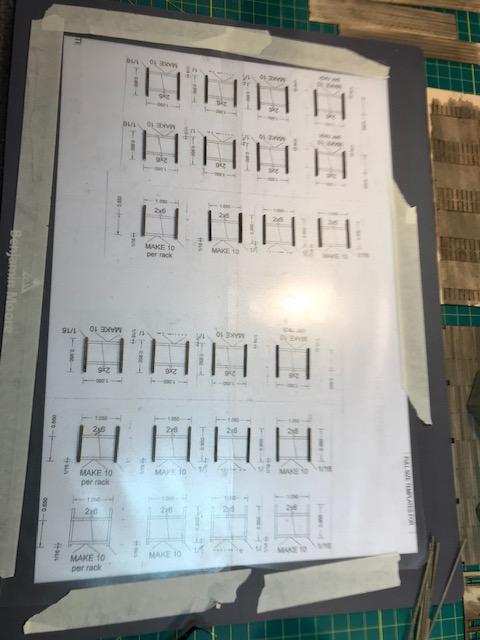
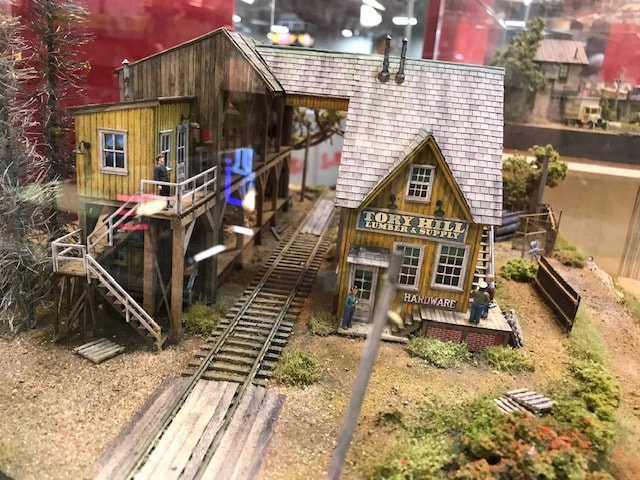
"Tory Hill Lumber" by Ken Wheeler

(Ken Wheeler)
Here are some progress photos of the Tory Hill Lumber Supply build. I bought this kit, by Bar Mills Model Works, at the Amherst train show in West Springfield last week. This is a four part structure kit and the lumber shed with the storage racks is the first two parts. I am really impressed with the detail of this laser cut wood kit and well worth the money. So far it's looking like it's supposed to. All the "lumber" is supplied in 10" lengths, which have to be pre-painted and cut to size...each piece. They provide full scale patterns with the instructions and I placed them under glass which made it easy to get everything square and true, which is critical. The problem I discovered is that the glue stuck to the glass! UGH. I did get the pieces off without destroying them, but I'll have to use something other than glass.
Here are some progress photos of the Tory Hill Lumber Supply build. I bought this kit, by Bar Mills Model Works, at the Amherst train show in West Springfield last week. This is a four part structure kit and the lumber shed with the storage racks is the first two parts. I am really impressed with the detail of this laser cut wood kit and well worth the money. So far it's looking like it's supposed to. All the "lumber" is supplied in 10" lengths, which have to be pre-painted and cut to size...each piece. They provide full scale patterns with the instructions and I placed them under glass which made it easy to get everything square and true, which is critical. The problem I discovered is that the glue stuck to the glass! UGH. I did get the pieces off without destroying them, but I'll have to use something other than glass.
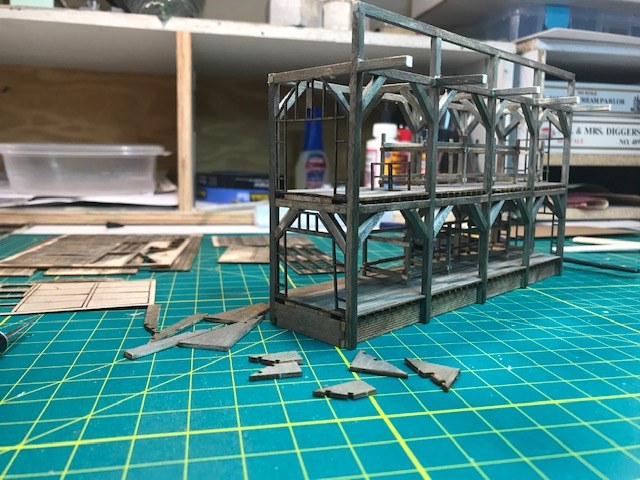
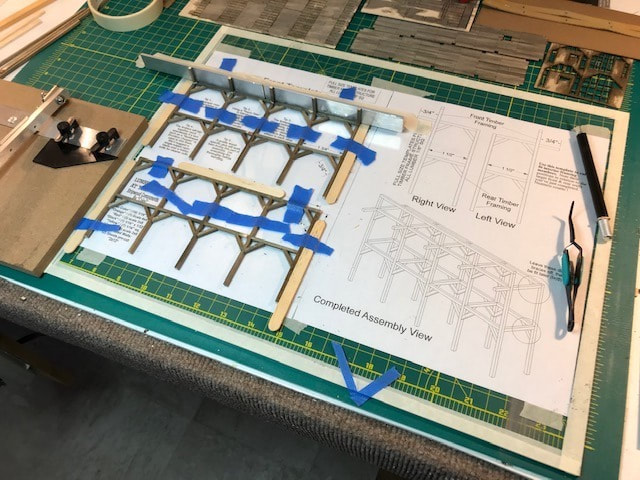
As you can see, they spared no detail. Here I am applying the individual strip wood siding. The rafter tail and floor joist details really make this. Here you can begin to see the actual size of this HO scale structure. HO is 1:87 (1"= 87" or 1"=7'3").
This is a photo of the professionally built display I saw at the show. This is what it's supposed to look like.
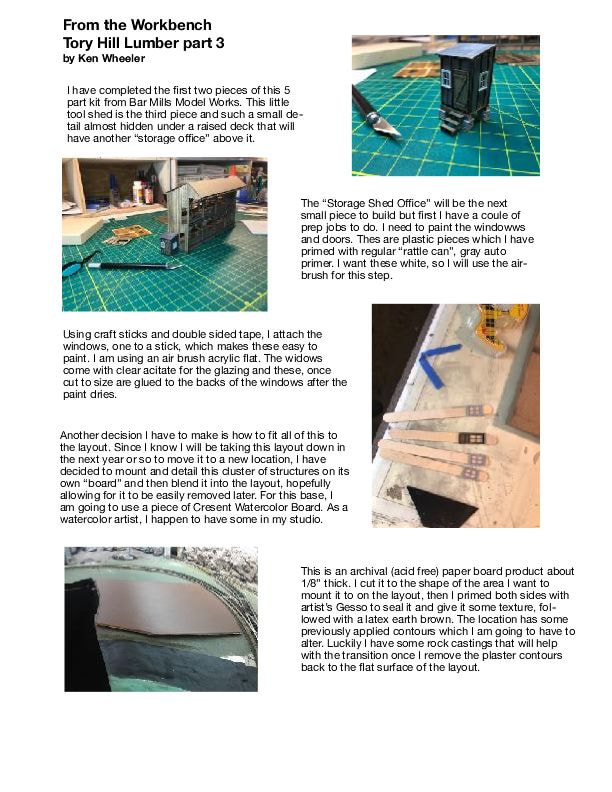
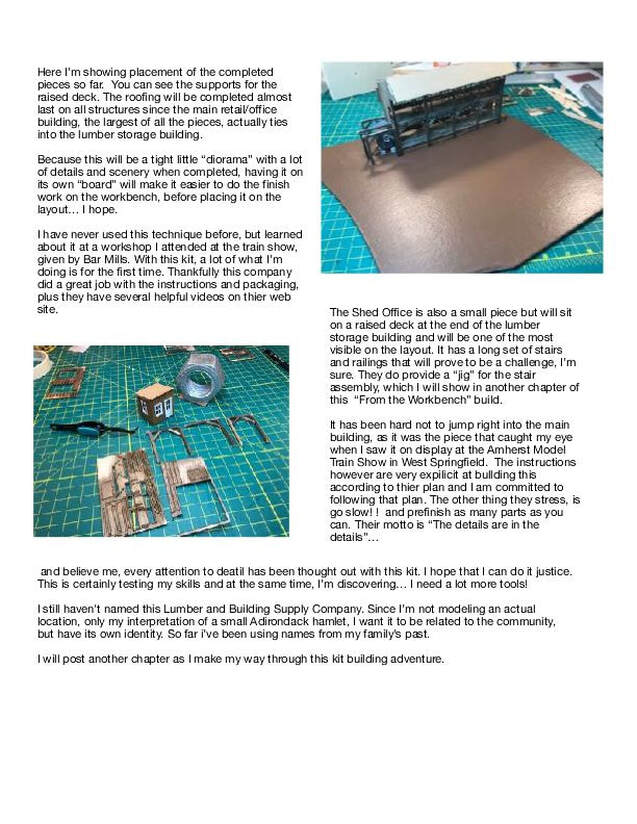
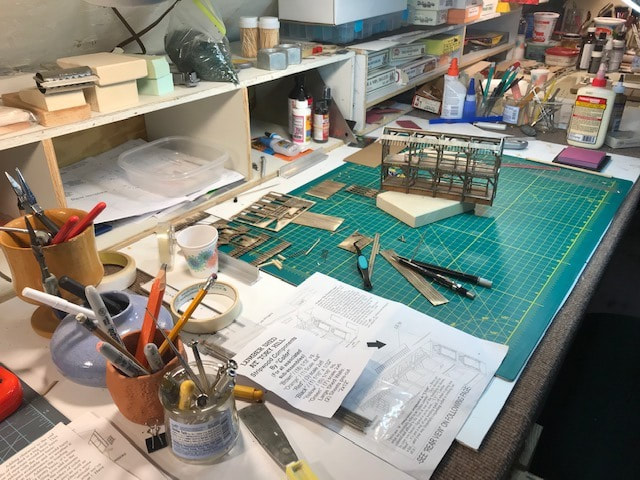
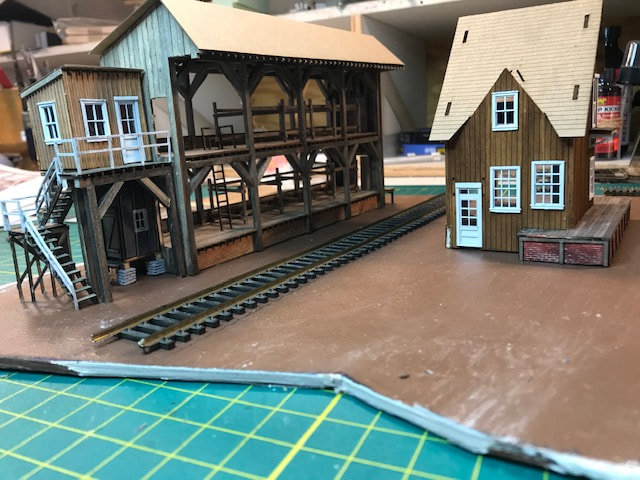
Finally getting back to the Tory Hill Lumber Co. build. Today I'm mounting the lumber shed, yard office and tool shed on the base that will set on the layout. I needed to mount these elements before I could easily add the stairs and railings. I love test fitting the diorama base on the layout to see how it will look. This Bar Mills Model Works kit is the most involved I have attempted yet. I'm happy with the results so far.

Club Vice President Michael Romanowski
Former Club President and Executive Board Member Forest Bevins
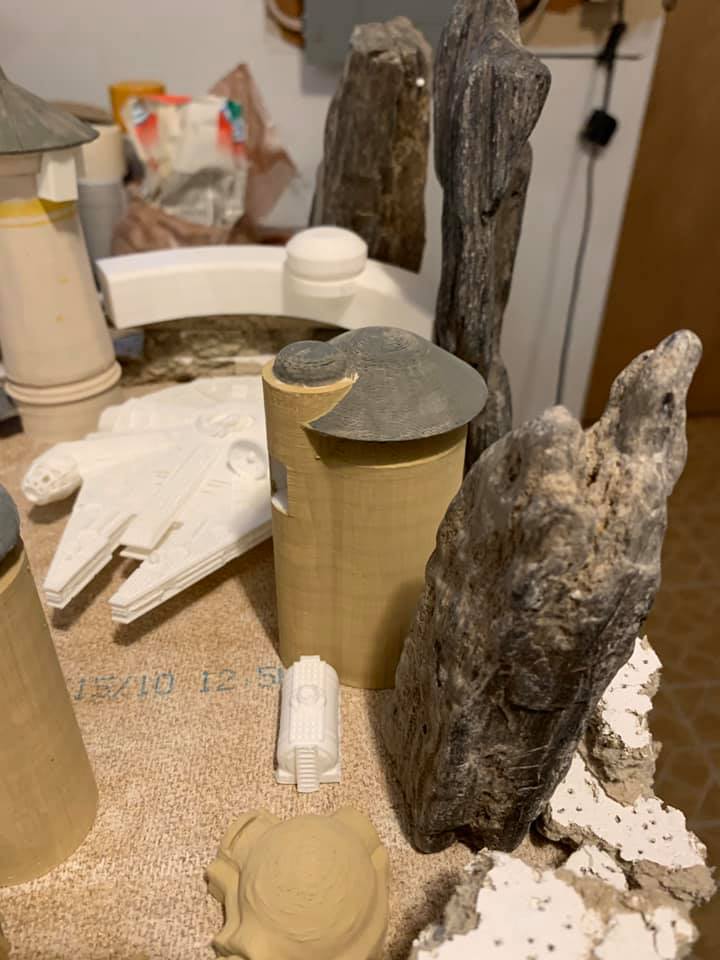
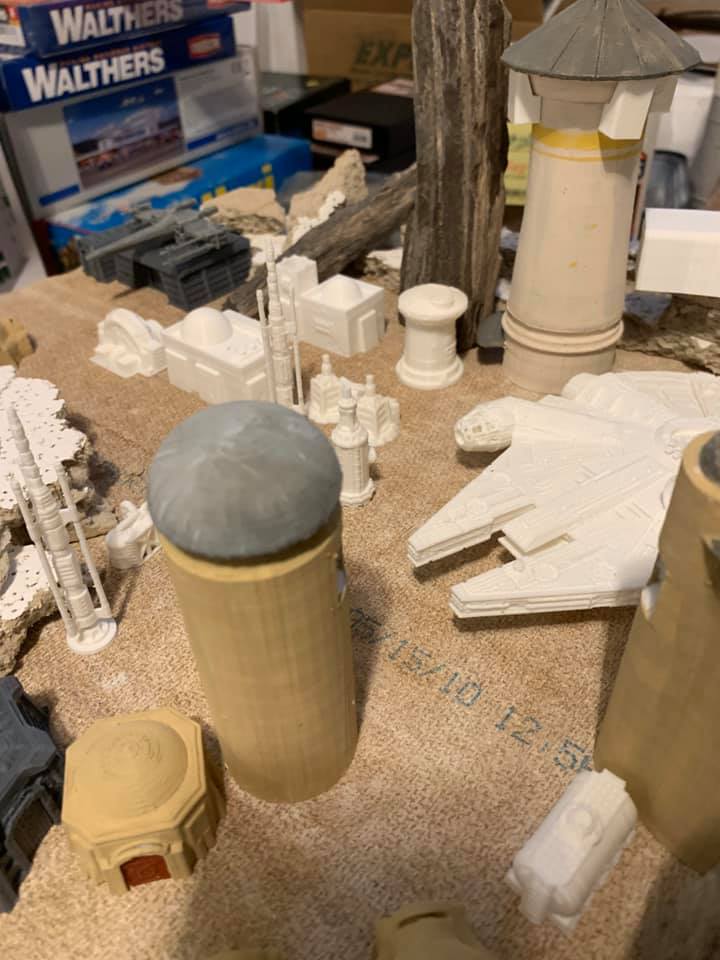
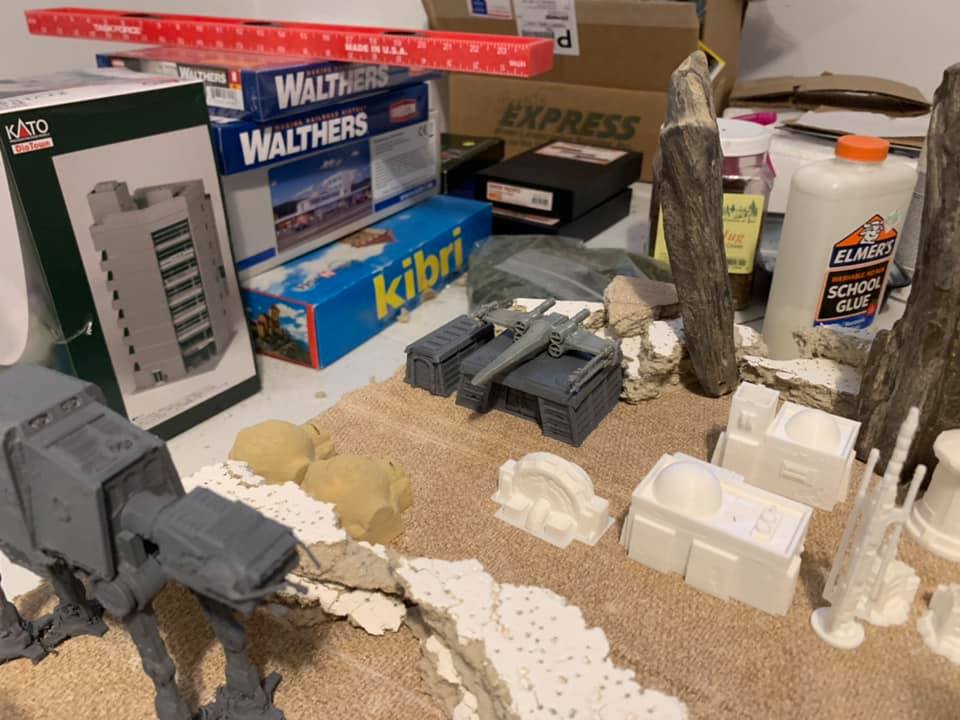
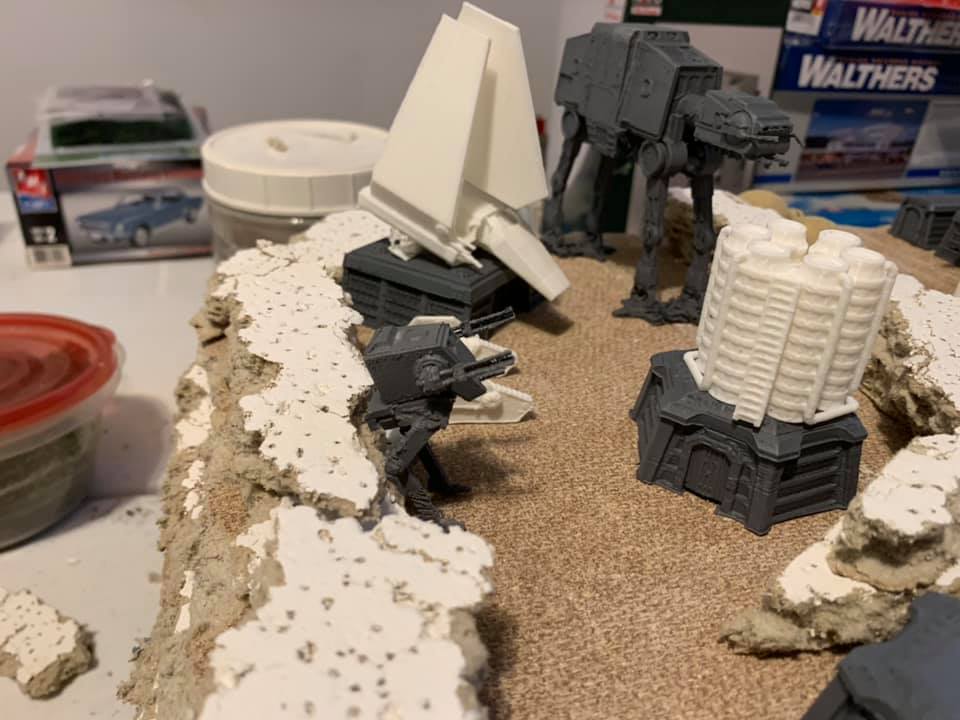
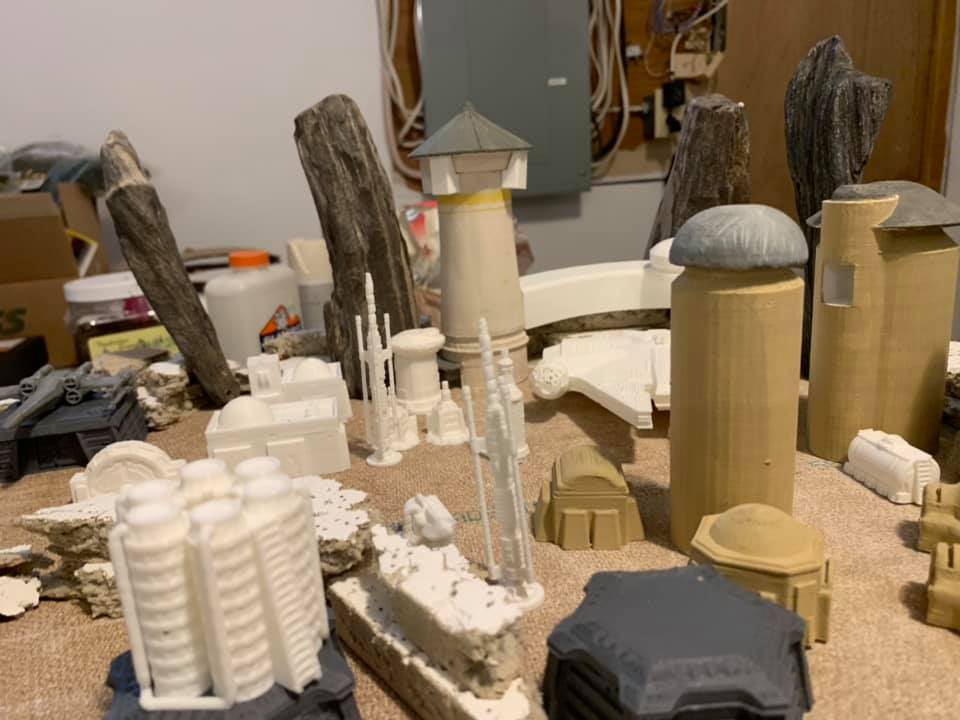
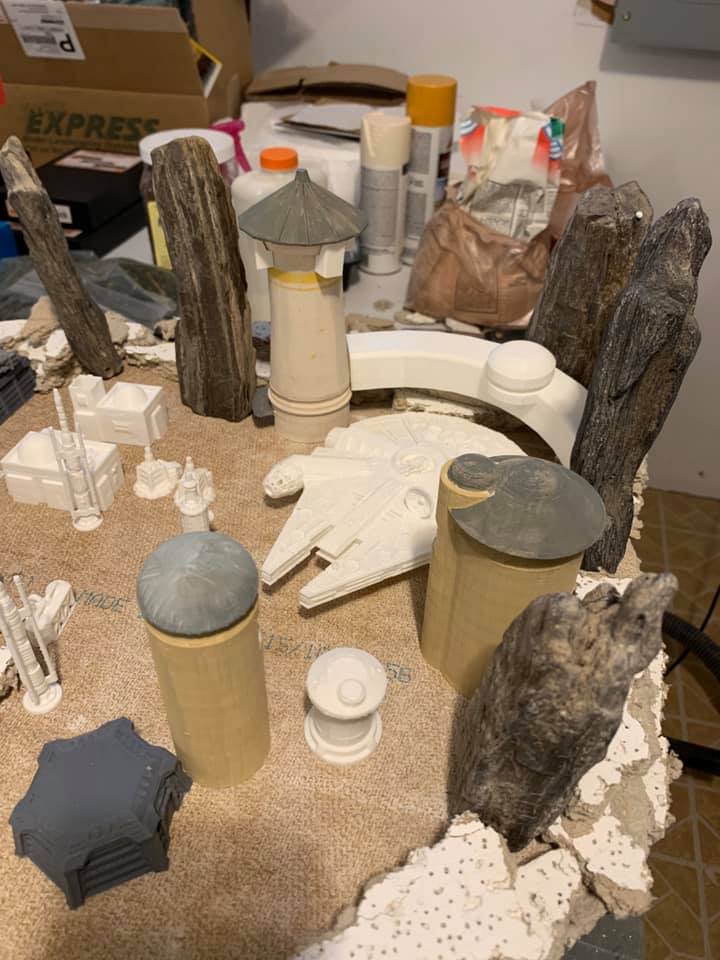
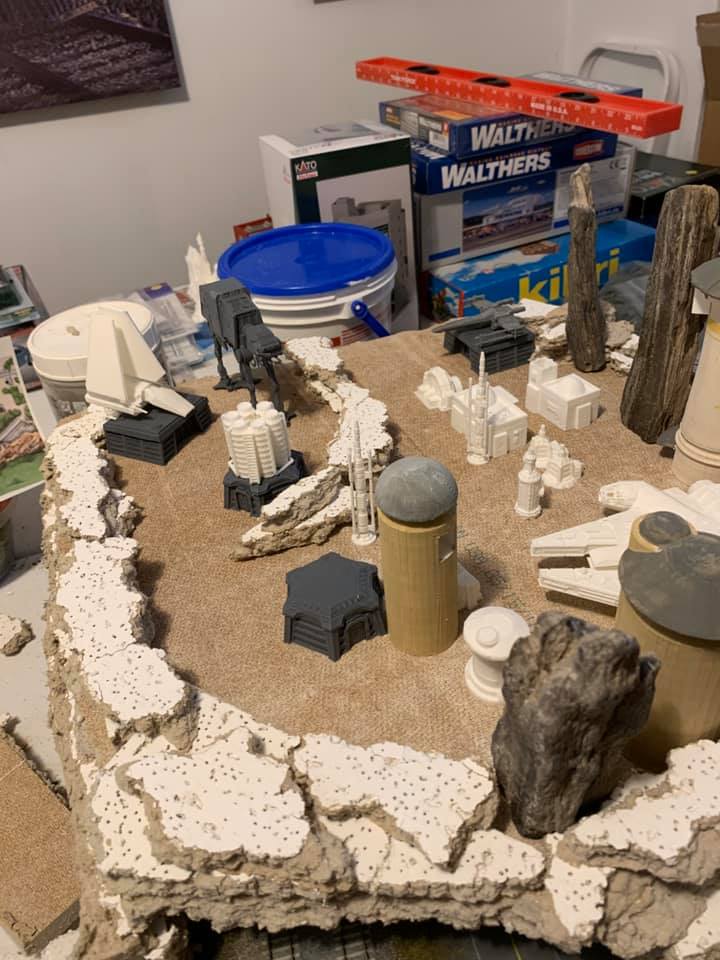
Attempting to create Star Wars Galaxies Edge on top of a large TTrak turn. Tracks and road tunnels underneath. Thanks to Forest Bevins for the great 3D printing.
Former Club President and Executive Board Member Forest Bevins
Attempting to create Star Wars Galaxies Edge on top of a large TTrak turn. Tracks and road tunnels underneath. Thanks to Forest Bevins for the great 3D printing.

Club President Ken Wheeler
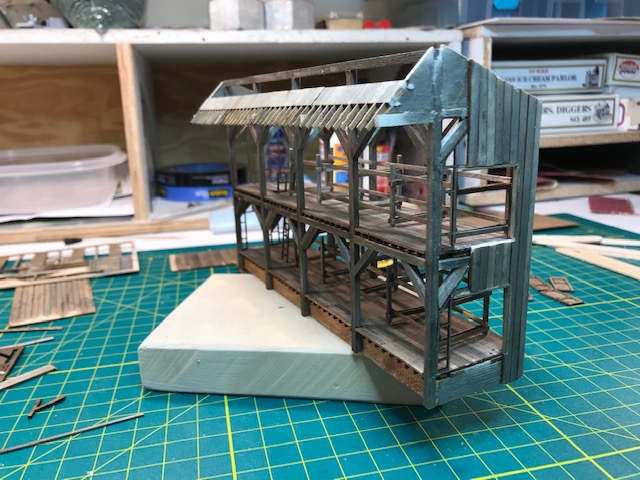
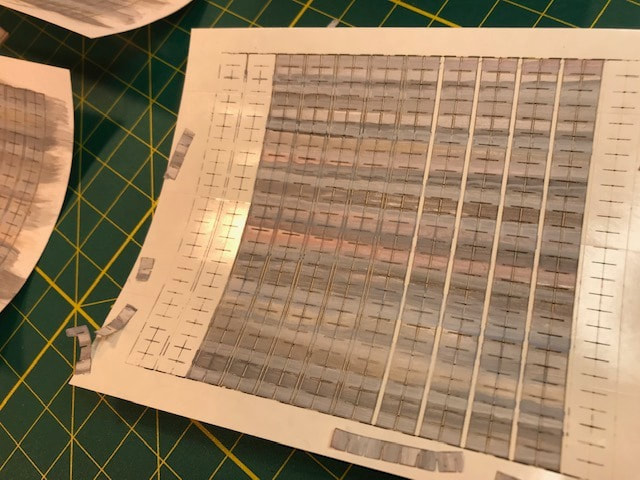
Today I'm a roofer. Applying the slate tiles to the roof of the Tory Hill lumber Co. These are strips of laser cut, coated paper with an adhesive backing. They come white, so I painted them in slate colors while still on the sheets. The card stock roof panels are pre gridded, to make the strips easier to apply. You have to be careful to alternate the "splits" that delineate the individual shingles. I am always impressed by the attention to detail with these laser cut kits and if you pre-paint everything with installation in mind, the final out come can be very realistic.
Today I'm a roofer. Applying the slate tiles to the roof of the Tory Hill lumber Co. These are strips of laser cut, coated paper with an adhesive backing. They come white, so I painted them in slate colors while still on the sheets. The card stock roof panels are pre gridded, to make the strips easier to apply. You have to be careful to alternate the "splits" that delineate the individual shingles. I am always impressed by the attention to detail with these laser cut kits and if you pre-paint everything with installation in mind, the final out come can be very realistic.

Club Vice President Mike Romanowski
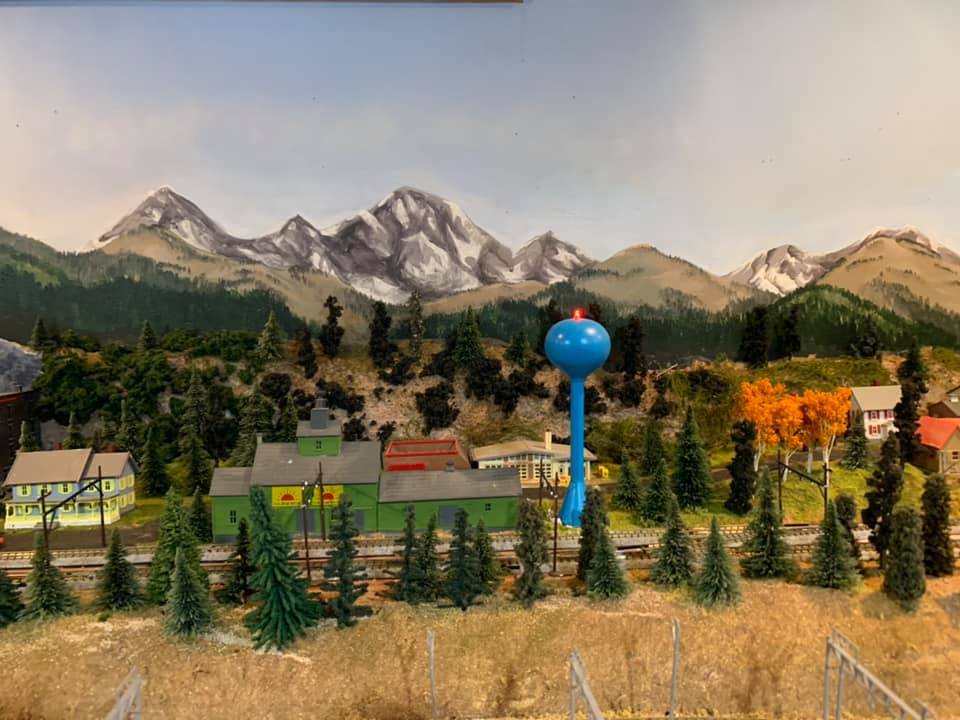
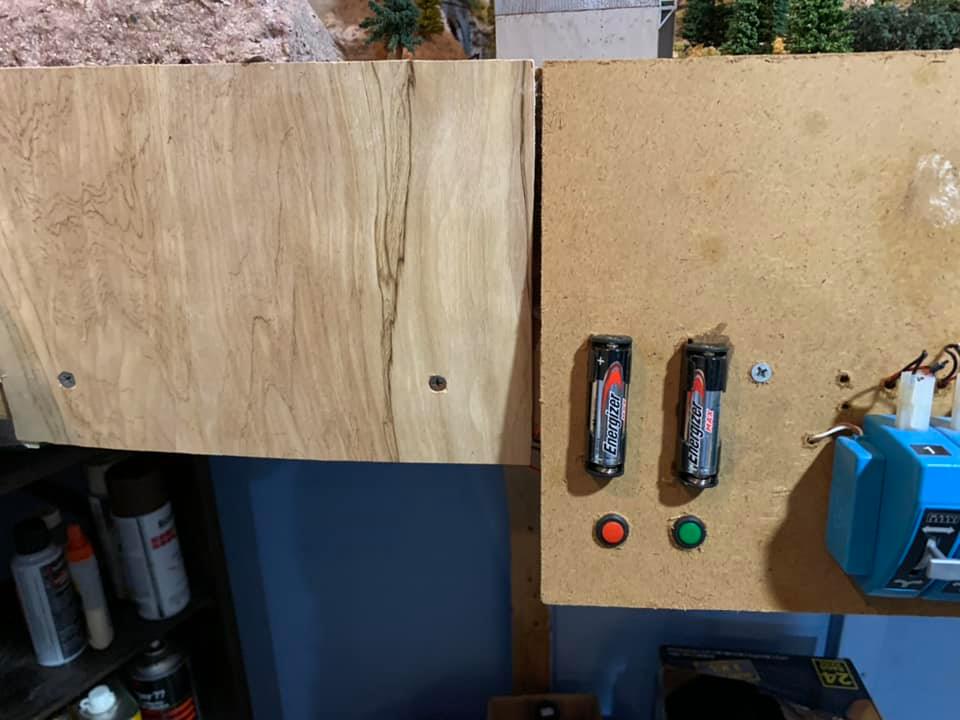
Working on my home layout. Added a new water tower with a blinking light. Then powered two of my wind turbines with AA batteries and push button switches. The third one is solar powered.
Working on my home layout. Added a new water tower with a blinking light. Then powered two of my wind turbines with AA batteries and push button switches. The third one is solar powered.

Ken Wheeler, Club President
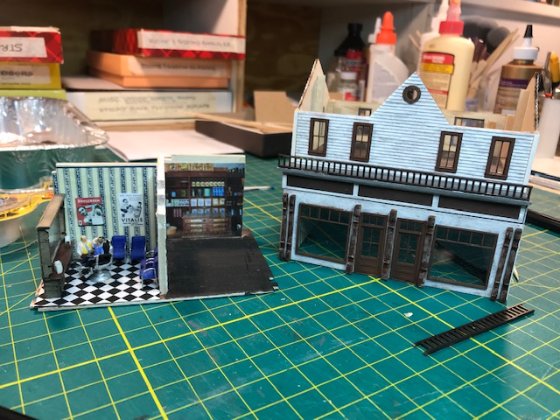
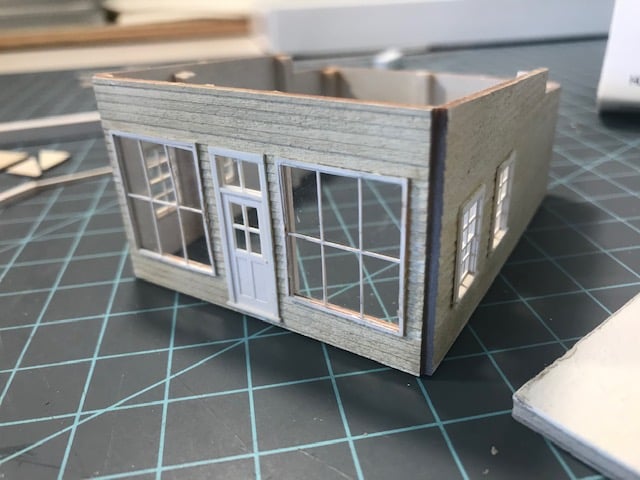
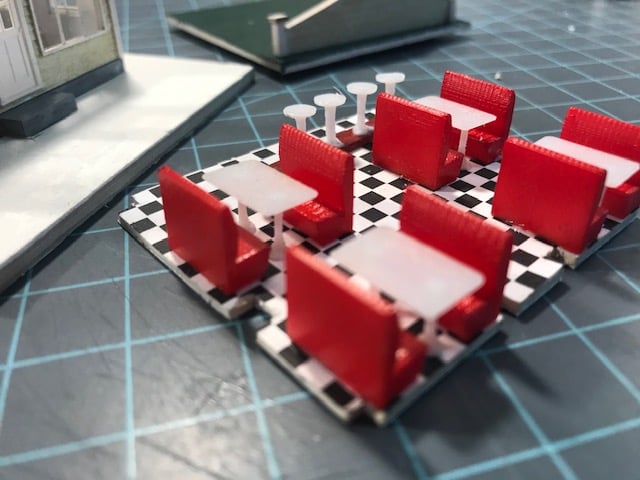
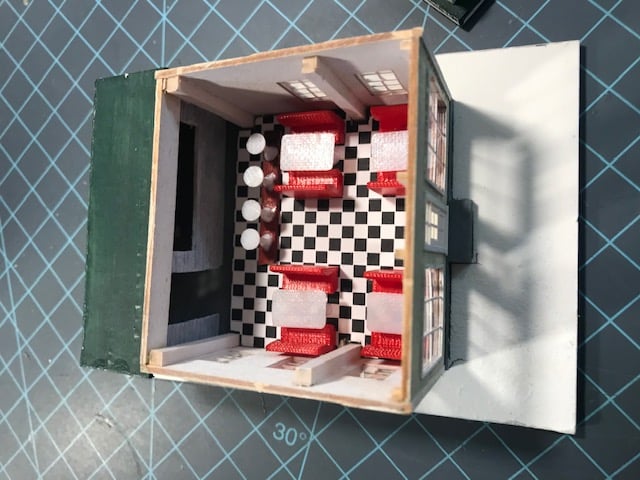
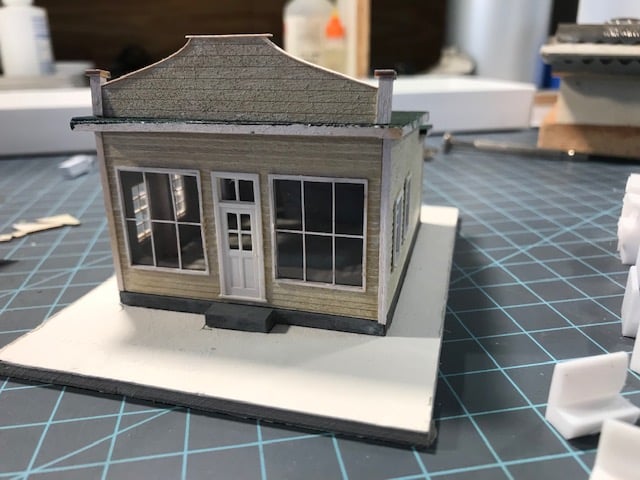
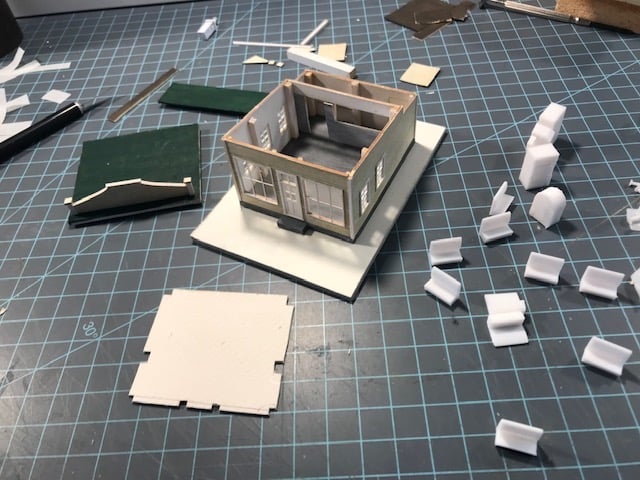
Making progress on "Flo's Diner" , the newest addition to the Adirondack hamlet on my HO layout. Friend and fellow Upstate Model Railroaders Club member Forest Bevins has his own 3-D printer and made me some of the interior details for the build. I now have tables, stools, booths, soda machine, Wurlitzer jukebox, and arcade machine! Thanks Forest! This will be my first attempt at interior details. With the large store front windows, this little kit begged for a detailed interior.
Making progress on "Flo's Diner" , the newest addition to the Adirondack hamlet on my HO layout. Friend and fellow Upstate Model Railroaders Club member Forest Bevins has his own 3-D printer and made me some of the interior details for the build. I now have tables, stools, booths, soda machine, Wurlitzer jukebox, and arcade machine! Thanks Forest! This will be my first attempt at interior details. With the large store front windows, this little kit begged for a detailed interior.
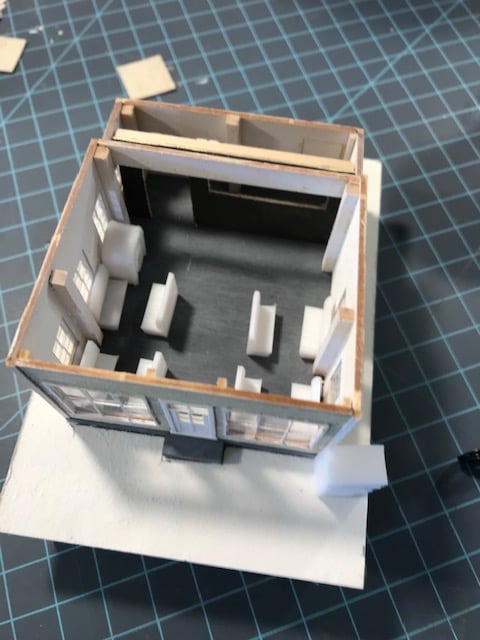

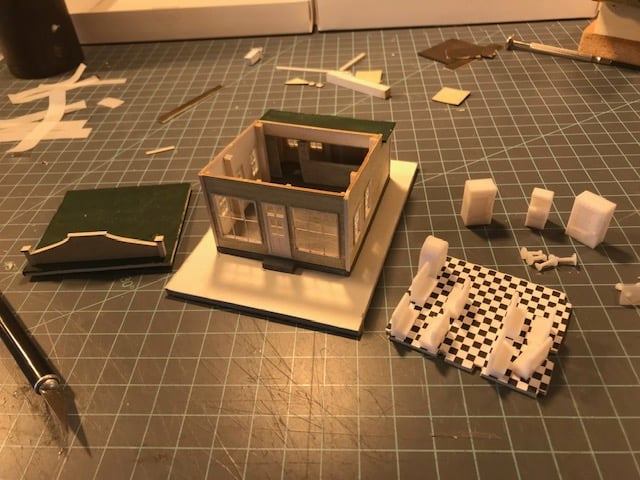
Ken Wheeler Club President:
This morning on the modeling bench I started assembling the interior for "Flo's Diner". This is my first attempt at an interior. I still have to paint the stools and scratch build a counter, but I am pleased with the results so far. I will certainly add lighting so the details will be visible once the roof is on.
This morning on the modeling bench I started assembling the interior for "Flo's Diner". This is my first attempt at an interior. I still have to paint the stools and scratch build a counter, but I am pleased with the results so far. I will certainly add lighting so the details will be visible once the roof is on.


Ken Wheeler Club President:
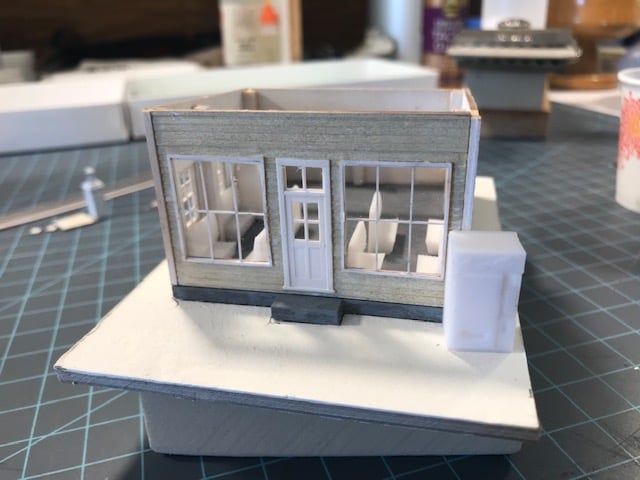
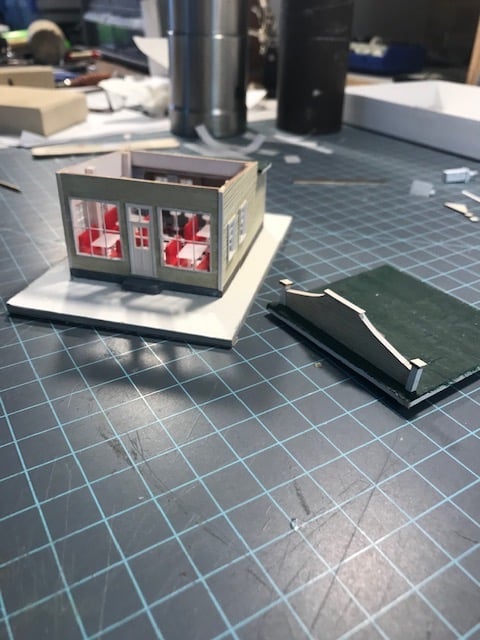
For those following the "Flo's Diner" build.
Here I have painted the roof and attached trims as well as supports, so it can be pressure fit, allowing it to be removable.
I made a floor insert from Cresent matt board and applied a paper floor tile pattern I made on the computer. The next step will be to paint the interior details and affix them to the floor before inserting it back in the structure. I will finish with an interior light. I am not sure I want to add cafe curtains. Even though they would look great from the outside, I don't want to block even the slightest view of the interior.

Ken Wheeler Club President:
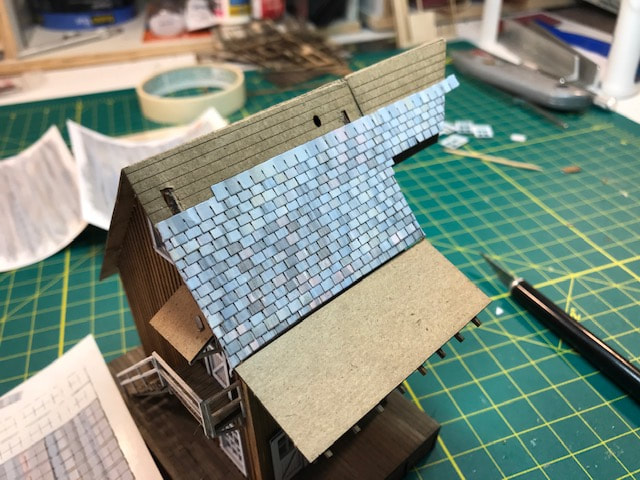
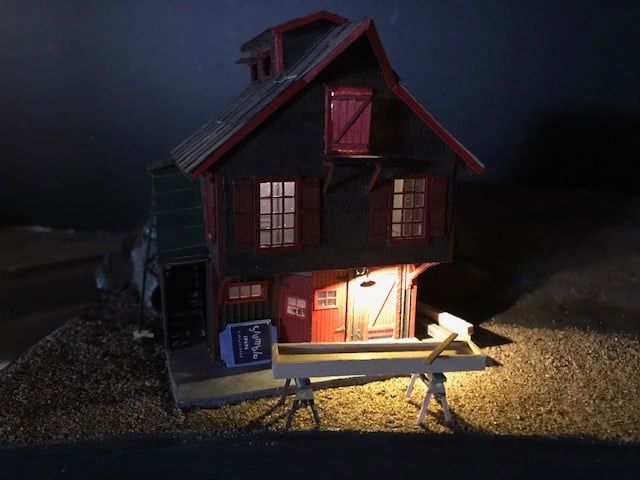
Work is progressing on the contest build. I am one of 16 in this category, all building the same "kit". I will be finishing mine as a sign shop and coloring will reflect the Adirondack Great Camp Santanoni. I have most of the parts primed and some pieces with the brown and red trim colors applied. This morning I started laying on the cedar shake shingles. These are self adhesive precut strips that I pre-painted on the sheet before applying. The realism you can get with these laser cut kits is amazing.
Work is progressing on the contest build. I am one of 16 in this category, all building the same "kit". I will be finishing mine as a sign shop and coloring will reflect the Adirondack Great Camp Santanoni. I have most of the parts primed and some pieces with the brown and red trim colors applied. This morning I started laying on the cedar shake shingles. These are self adhesive precut strips that I pre-painted on the sheet before applying. The realism you can get with these laser cut kits is amazing.

Ken Wheeler Club President:
Working an hour or two every morning, I am making progress on the contest build. I have the shingles on and the walls and roof assembled. Now I can set it on the diorama board and see how I want to place it so it will blend in with the layout. I think the brown and red "Santanoni" colors will work great on the early to mid 1900's, Adirondack, logging layout.
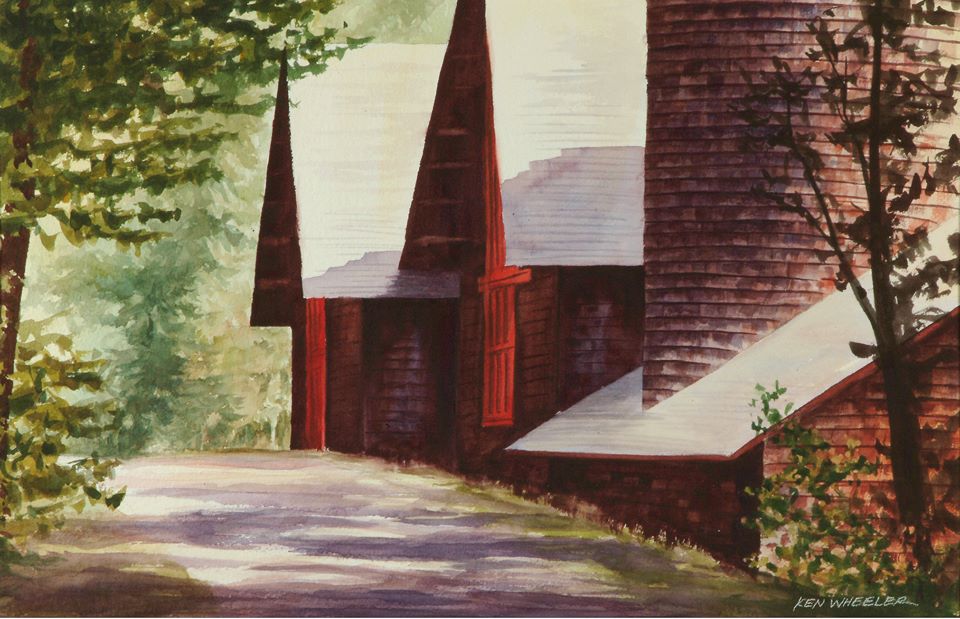
I painted the windows and am doing a test fit to see how they look. They still need the glazing, but I'm happy with the colors. This is beginning to look like the buildings at the Adirondack Great Camp Santanoni in Newcomb, NY I have included my watercolor painting of "The Barns at the Santanoni". The barns are no longer there, as they were lost to fire about ten years ago, due to a careless or disrespectful visitor.
I got the widows glazed and installed, some additional trim painted along with touching up the cedar shake siding. I also have been working on the land formations on the diorama board and test fitting it into where it will live on the layout after the contest. Final landscape details are still in the design phase, but I like how it fits so far.
Working an hour or two every morning, I am making progress on the contest build. I have the shingles on and the walls and roof assembled. Now I can set it on the diorama board and see how I want to place it so it will blend in with the layout. I think the brown and red "Santanoni" colors will work great on the early to mid 1900's, Adirondack, logging layout.
I painted the windows and am doing a test fit to see how they look. They still need the glazing, but I'm happy with the colors. This is beginning to look like the buildings at the Adirondack Great Camp Santanoni in Newcomb, NY I have included my watercolor painting of "The Barns at the Santanoni". The barns are no longer there, as they were lost to fire about ten years ago, due to a careless or disrespectful visitor.
I got the widows glazed and installed, some additional trim painted along with touching up the cedar shake siding. I also have been working on the land formations on the diorama board and test fitting it into where it will live on the layout after the contest. Final landscape details are still in the design phase, but I like how it fits so far.

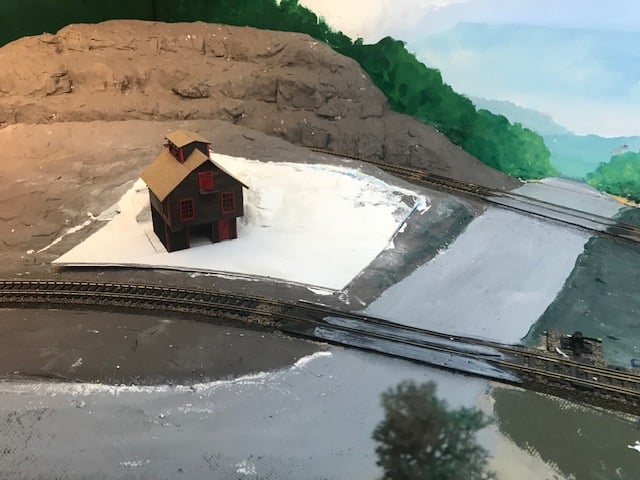
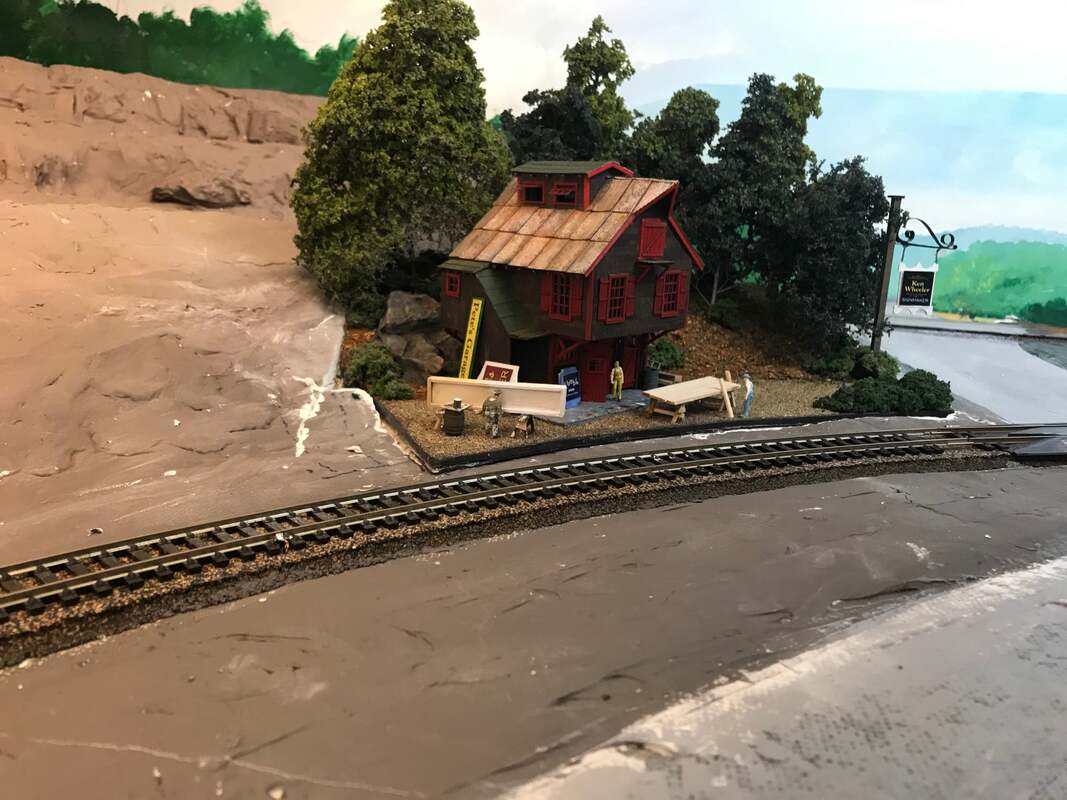
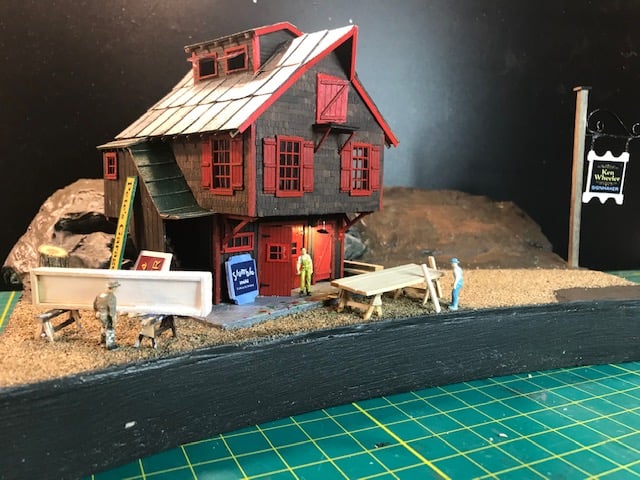
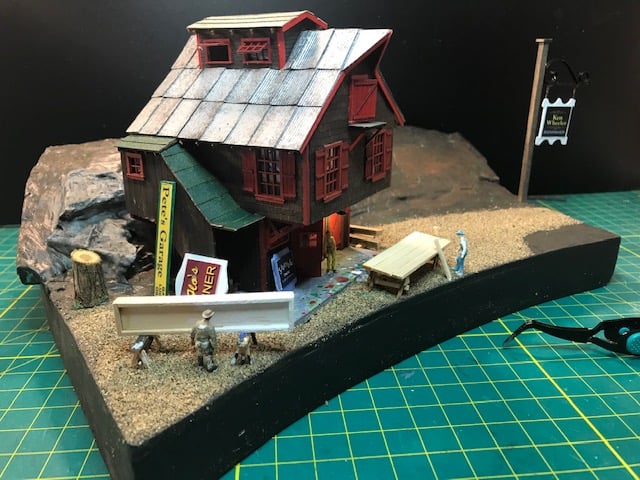
I have completed the structure for the HO Modeling Group contest. Today I am hand making sawhorses and signs for the scene details. After applying some paint and lettering to a few of these sign "projects", I think they will look great on the finished diorama.
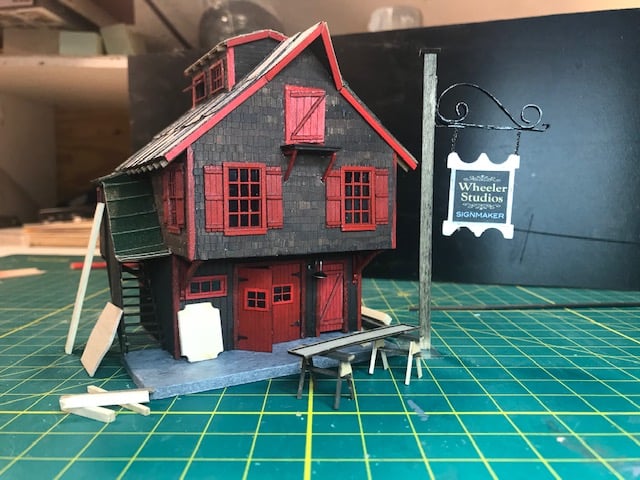
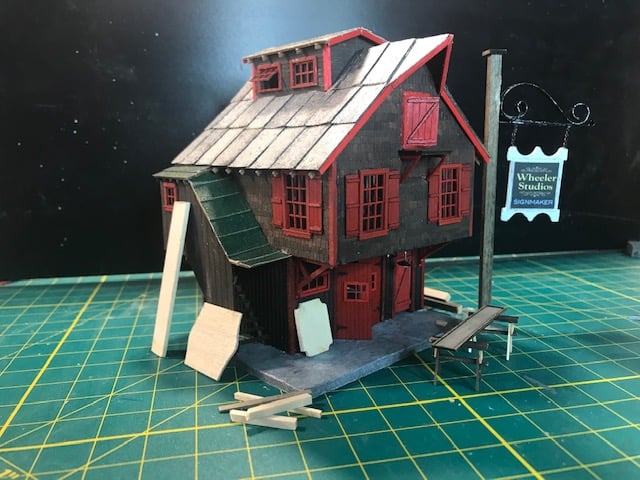

I am beginning to add the details to the "Sign Shop" diorama. I still have a lot of ground cover, shrubs and trees to to add, which will create the forest backdrop, but the foreground interest is taking shape nicely. As you can see, it's busy at the sign shop. No problem keeping the assistant and the apprentice busy as the work spills outside. I ordered some miniature lighting from a company that makes lighting for models. These are battery operated very tiny LED lights. Now I wish I had put some details inside the building...
The stuff available for model making today is very cool.
The stuff available for model making today is very cool.

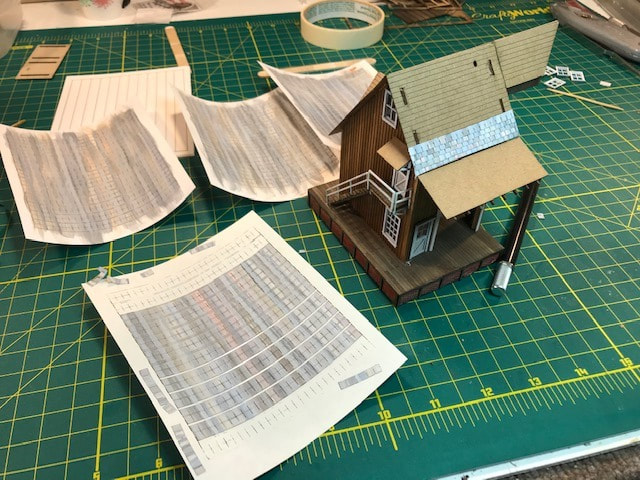
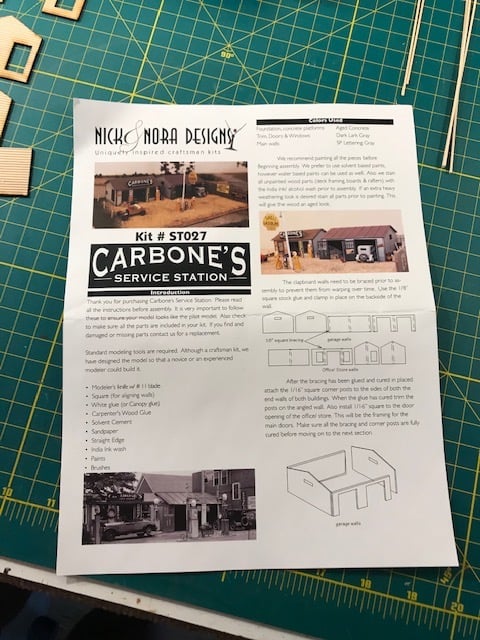
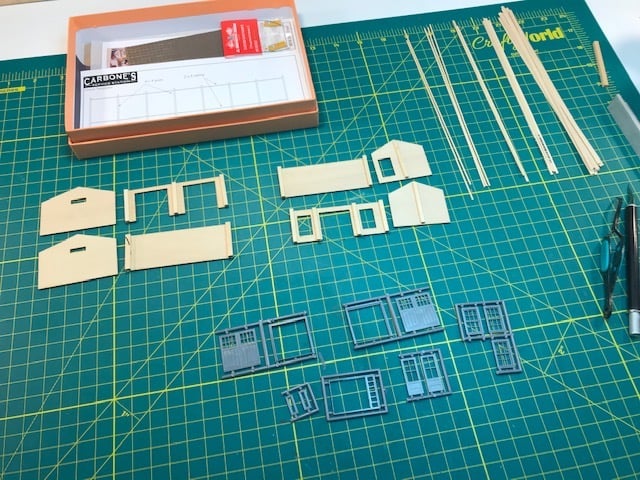
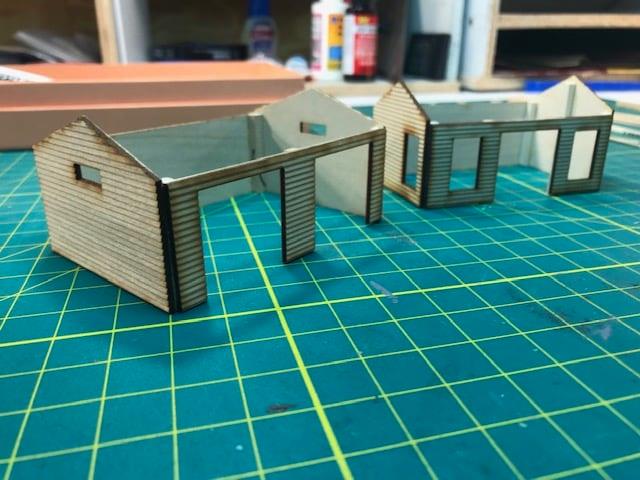
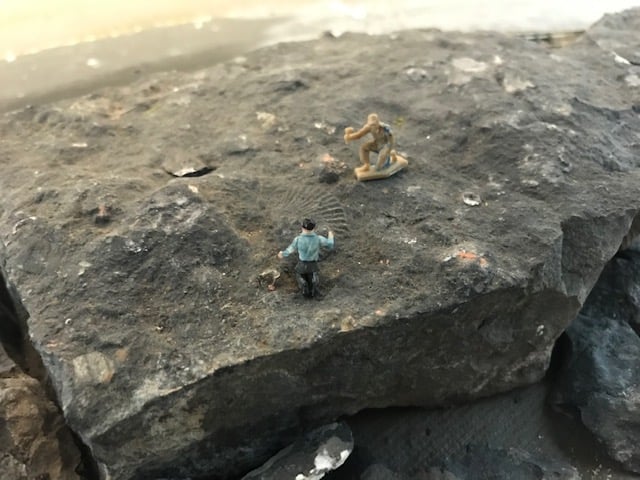
Starting a new laser wood kit today. "Carbone's Service Station" by Nick & Nora Designs. I bought this little kit at the Amherst Train Show last January. It was one of 7 kits I bought. This is pretty simple but has a lot of potential. There are two buildings and a lot of fencing, signage and options for detailing. This will fit nicely on my layout. I have the bracing done and have chosen a color scheme, now I just need to decide what I'm going to name it. The walls are glued and the foundations are made. A site location on the layout has been decided as well, so the diorama base can be cut to shape and planning for the scene can begin while the rest of the structure is being done. As you can see it is located across from "Fossil Rock".

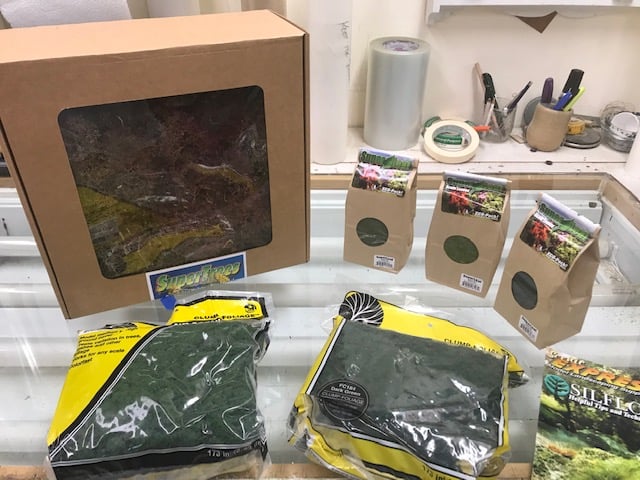
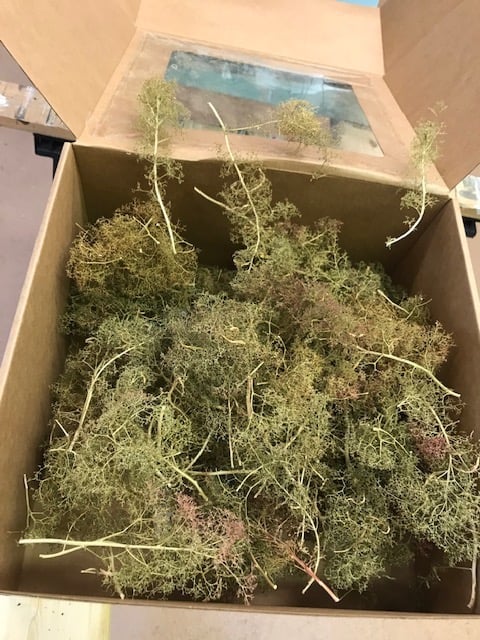
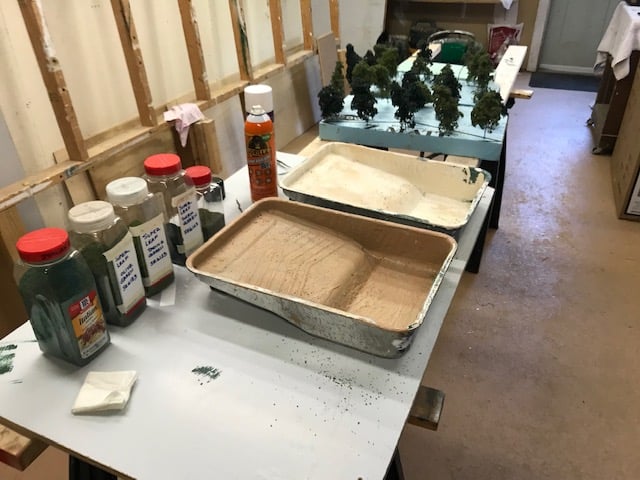
Today I am finishing up a batch of "trees" for the layout. These start as dried "flower" sets from an Australian sagebrush plant that I purchased from a modeling scenery supplier. They get dipped in a thin water/white glue solution, hung out to dry with a weight attached to help straighten them. Then they are sprayed painted with, first black and then gray on the trunks. When that's dry, they are hit with a generous coat of spray adhesive, then sprinkled with a ground foam "leaf product, to simulate leaves. Finally they get a coating of cheap hair spray to set them. Now I just need about 700 more to make a forest.


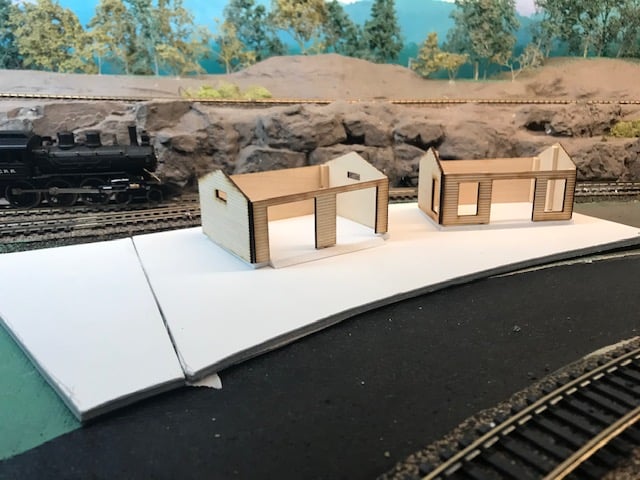
I'm working on a small, two structure laser wood kit by Nick & Nora's Designs, called Carbone's Service Center. I am going to call this Jr. Sample's Service Center & Used Car Emporium. I know... long name, but I think it's indicative of the 20's and 30's.
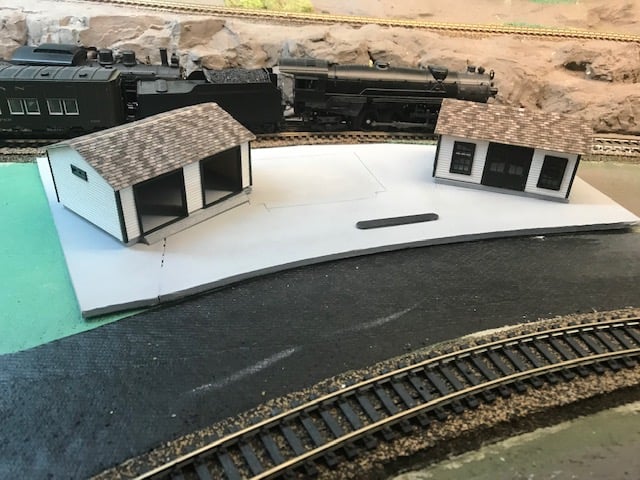
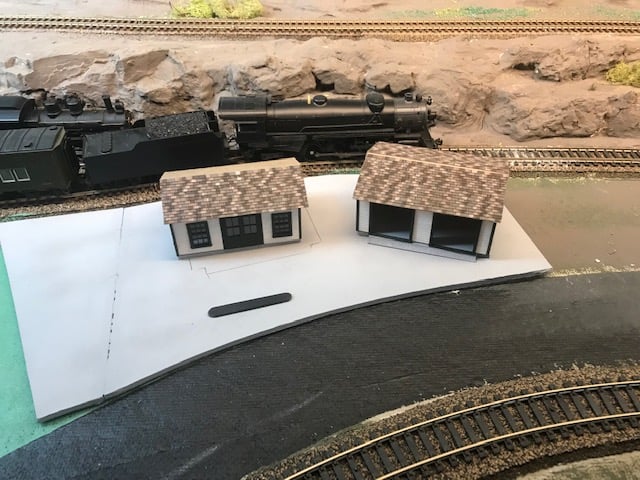
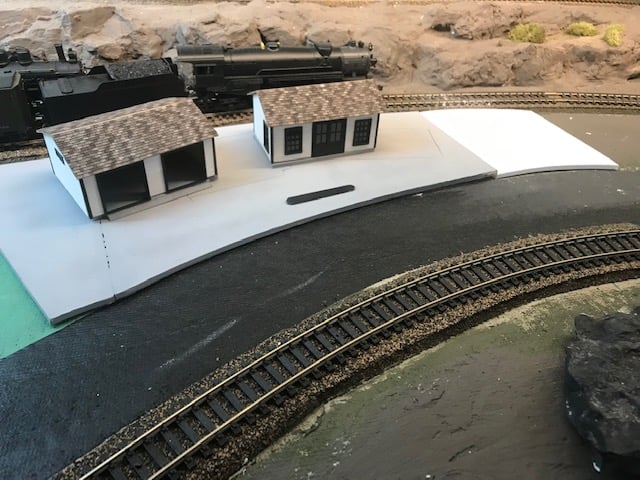
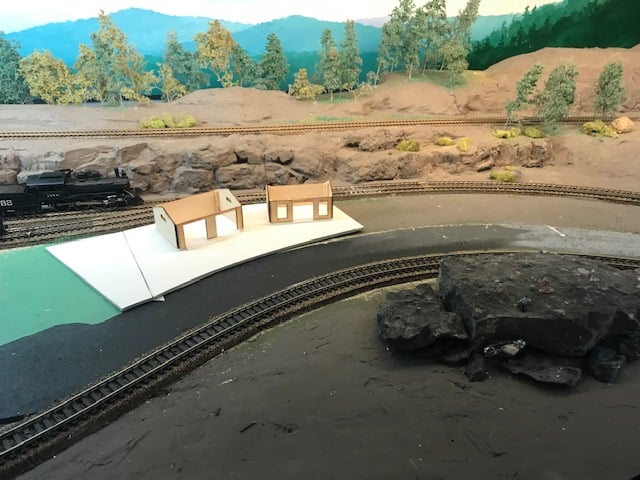
I am far enough along, so now I have to decide positioning on the layout. I have chosen a location, but I need to decide how to best place the structures in the space. Here is choice 1, 2, and 3. The black strip represents the gas pump island. On #3, I have added to the space to the right where my "used" car lot could be. I think I like the added space.
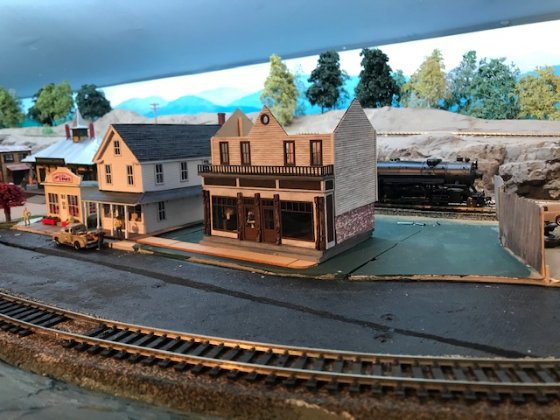
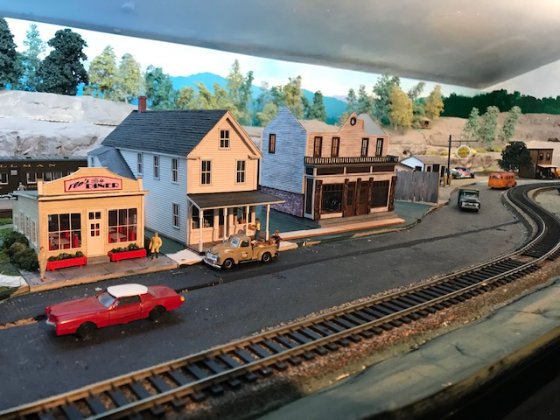
I have the roof work about complete for the Jr. Sample's Used Car Emporium and Service Center as well as the placement on the layout. There will be a lot of details on this one and I still need to do an internet search for old cars. The town of Kennydale is taking shape now, with the Logging Camp, Lumber & Building Supply, Train Depot, Flo's Diner, Jr.'s, The Sign Shop, FE Wheeler Lumber Co & Saw Mill. and the Adirondack Timberline Railroad Railroad Yard.
I am far enough along, so now I have to decide positioning on the layout. I have chosen a location, but I need to decide how to best place the structures in the space. Here is choice 1, 2, and 3. The black strip represents the gas pump island. On #3, I have added to the space to the right where my "used" car lot could be. I think I like the added space.
I have the roof work about complete for the Jr. Sample's Used Car Emporium and Service Center as well as the placement on the layout. There will be a lot of details on this one and I still need to do an internet search for old cars. The town of Kennydale is taking shape now, with the Logging Camp, Lumber & Building Supply, Train Depot, Flo's Diner, Jr.'s, The Sign Shop, FE Wheeler Lumber Co & Saw Mill. and the Adirondack Timberline Railroad Railroad Yard.